OK guys this post is monstrous but what I’m going to teach you is how to build an Android app from scratch, step-by-step and without any prior experience in programming or developing Android apps.
What this guide aims to do is to take you from knowing absolutely nothing about developing Android apps, to a point where you’ll have a fully working app that runs on your phone.
This guide won’t turn you into an expert by any means, but it will provide a stepping stone for you to learn more about Android and develop your skills further (if you want to of course).
So, you’ve got a couple of ways of approaching this post:
- You can follow the instructions and explanations in this guide and end up with a fully functional Android app at the end of it. You should then be in a position to develop your skills further off the back of it with the resources I’ve provided.
- You can just read the post and/or build the app and use it just to get an appreciation for how Android apps are developed.
So, I’m hoping that there is something for everyone here.
See also: How To Speed Up Your Android Phone
All the resources that you need to produce the app are on GitHub, but I strongly suggest you follow along and write the code out for yourself first rather than just running the code I’ve provided for you.
That way, you’re likely to learn more and take it all in.
So, first things first, go and grab a coffee and then we’ll begin.
Oh and by the way, this is quite a long post which will take you from the beginning to the end of developing a simple Android app, but don’t feel like you have to go through it all at once, bookmark it and come back to it later.
What we’re going to build
To whet your appetite for what’s to come, we’re going to build a very simple Android application that will display a random number on your phone, once the button is clicked.
Check out the screenshot below:
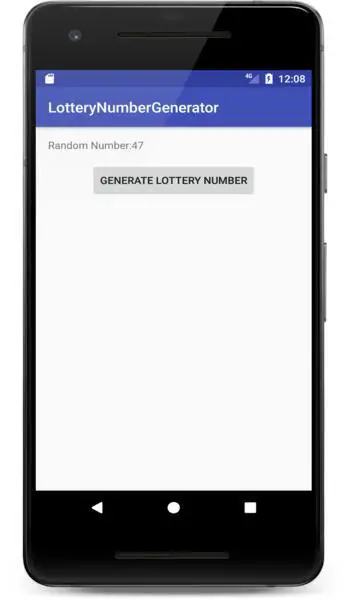
The great thing about this app is that it’s simple enough to build so that (hopefully) anyone can do it with these instructions. It’s also complex enough so that it’s actually useful, i.e. you use it to choose your lottery numbers ;). But my main aim is that by building this app, you will gain the confidence to build more useful and complex apps off the back of it.
Now what it will teach you is how information is displayed on your screen and it will also teach you how to add buttons to your Android app. These two things are pretty much common to every app that you’ll see.
First of all, though, I’m going to give you a quick whistle stop tour of Java, which is the programming language used to develop Android apps. Don’t be put off by this. I’m only covering the absolute basics here, and is by no means comprehensive, but it will be useful for when we actually come to developing the app.
The Java Programming Language
As I mentioned above, the language that is used to develop native Android apps is Java.
Java is one of many different programming languages out there, some of which you’ll have heard of, some you might not have.
Other languages include C, C++, Python, Swift (used to develop iOS apps), C# (pronounced C Sharp), Lua, PHP and the list goes on.
One of the things that a lot of modern languages have in common is the fact that they are Object Oriented and Java is no exception.
Let’s have a little look at some of the main concepts of a Java program.
Objects and Classes
Java is one such object-oriented programming language, and as you might have guessed, it revolves around the idea of “objects”.
Now these “objects” can represent objects that we see in everyday life. So, for example, if you were to write some code to model a car, then you’d have a wheel object, a steering wheel object, a brake object and so on.
You can create different instances of the Car object to represent different cars. When these “instances” are created, they are created in the computer’s memory from a blue print called a “Class”. Once your “Car” instance is created in memory, you refer to that instance as an “object”.
A “Class” is basically your own custom data type. It’s the definition for an object or template if you like. Classes tend to be defined in their own file by you or they can be defined in a library, written by a third-party.
In Java, the name of the class has to be the same name as the file itself. So, for our Car class, we’d have a file called Car.java. Now there are exceptions to this rule, as you can have inner classes, but this is out of the scope of this tutorial.
Still confused about classes and objects?
OK let me explain a little further. Say we created a new file to contain our class and named it Car.java, this would be our template.
If we were to create an object from this class, we’d use the keyword new, to create an instance of it in the computer’s memory.
So, we’d do something like this:
Car myCar = new Car();
So, Car is the actual class, “myCar” is the actual reference to the object, and if we have a variable named mileage in our class, then our mileage variable would have a value.
Here’s another example: String. String is one of Java’s built in datatypes. String is a class and is used to represent a string of letters.
So, we can do something like this:
String myName = new String("Baz");
What we have done here is create an instance of a String in memory and passed a value to it at the same time. So “myName” is the actual object which has a value of “Baz”.
Methods
Classes have behaviour and the ability to store data in them too. Behaviour is defined by a method which can be called whatever you want like doSomthing(). When your program runs, the methods you have defined will run and the program will execute the logic that has been defined in those methods.
Methods basically do things and they can use the variables defined within the class to perform some logic. There is no restriction on the amount of code a method can execute, but generally they should perform a single task and be easy to understand. If a method becomes too large, it can be hard to know what’s going on and should be split out in multiple methods or even classes.
In the app that we’re going to be developing soon, we’ll be creating a method called generateAndDisplayLotteryNumber().
The method will generate a random number, store it in a variable and display it on the screen in a TextView.
Variables
Not only do classes have behaviour, they also have the ability to store data. So, in our Car class, we could have a variable defined in there called mileage, which would keep track of the mileage of the vehicle.
Now for something like mileage, you might not want to create your own data type for it. Instead, you’d probably use one of Java’s built-in data types like an Integer (a whole number).
Other types exist too such as Boolean (true or false value), Float (floating point value like a decimal (e.g. 5.2) and String (e.g. a word like “hello”).
So, we’ve looked at classes, objects, methods and variables, but there’s a lot more to Java. But don’t let that put your off. Think of it as a stepping stone to learn more.
If you want to learn more, I recommend reading Learn Java for Android Development, which is an excellent tutorial to get you started.
It’s also worth watching some YouTube videos on Java too because there’s a lot of high quality ones on there like this series of Java programming tutorials and also the video below which goes over most of the Java concepts in one video:
Building The App
OK this is it guys, the moment you’ve been waiting for. I’m actually going to walk you through building the app.
The app we’re going to build is very simple. When the user clicks a button, it will generate a new random lottery number and display it on the screen.
But it will involve the key concepts that I talked about above such as classes, methods, variables etc.
Follow along the best you can, and if you have any questions, let me know in the comments. As I mentioned above, all the code is on GitHub.
Instruction #1
The first thing you need to do is download and install the Java JDK. It’s stands for Java Development Kit and enables you to start developing programs in Java. Make sure you get the latest and greatest which at the time of writing is Java 8.
Instruction #2
Download and install Android Studio and accept all the default options as you’re going through the wizard.
Android Studio is what is known as an Integrated Development Environment or IDE and is the official IDE for Android development.
Basically, it’s a program that provides loads of useful tools to enable you to build an app. In Android Studio, you can build your app and use it to run your app on your phone or the emulator (simulated Android device basically).
You could write your app in Notepad or something similar, but it would be incredibly difficult to find errors in your code, it would be difficult to format your code so it’s actually readable and very difficult to run it on your device.
It is possible but honestly, make your life easier and use Android studio. Most Android developers use it now and it’s based on Intellij, which is extremely popular among professional Java developers.
A Note About Android Studio
When you create a new Android project, Android studio will create all the files necessary for you to build and run a very basic app.
It basically builds the project structure for you, includes the Manifest file (more on that later), your layout files, gradle files (which you need to build the project) and a basic “Activity” class which will be the main entry point into your app.
Instruction #3
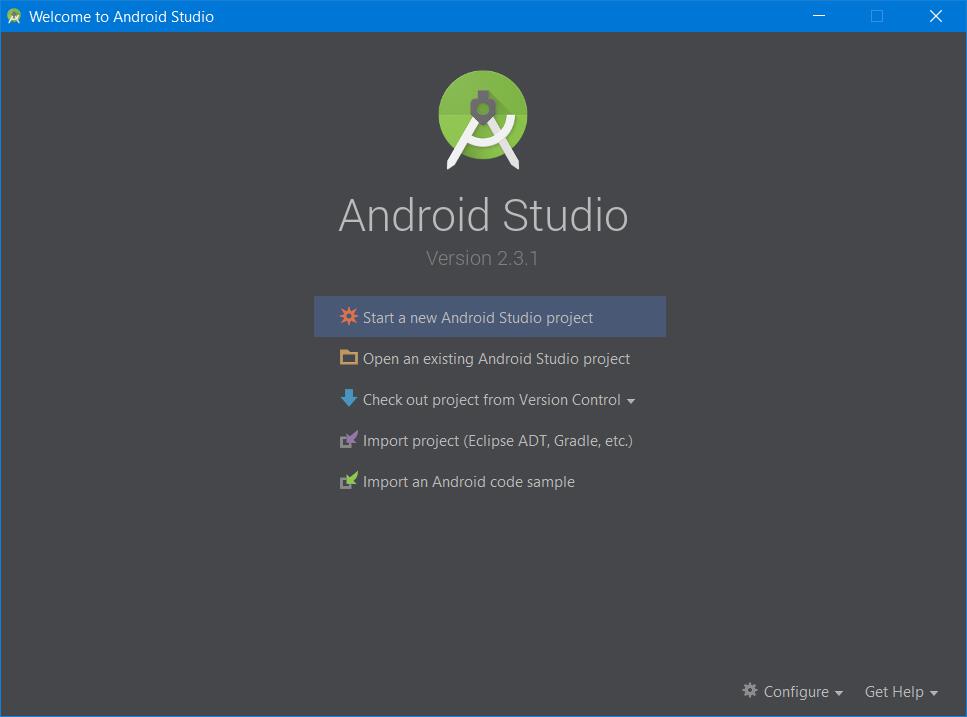
The next thing you need to do is open Android Studio and in the Welcome to Android Studio window, click Start a new Android Studio project.
Alternatively, if you’ve already opened Android Studio, you can click File -> New Project.
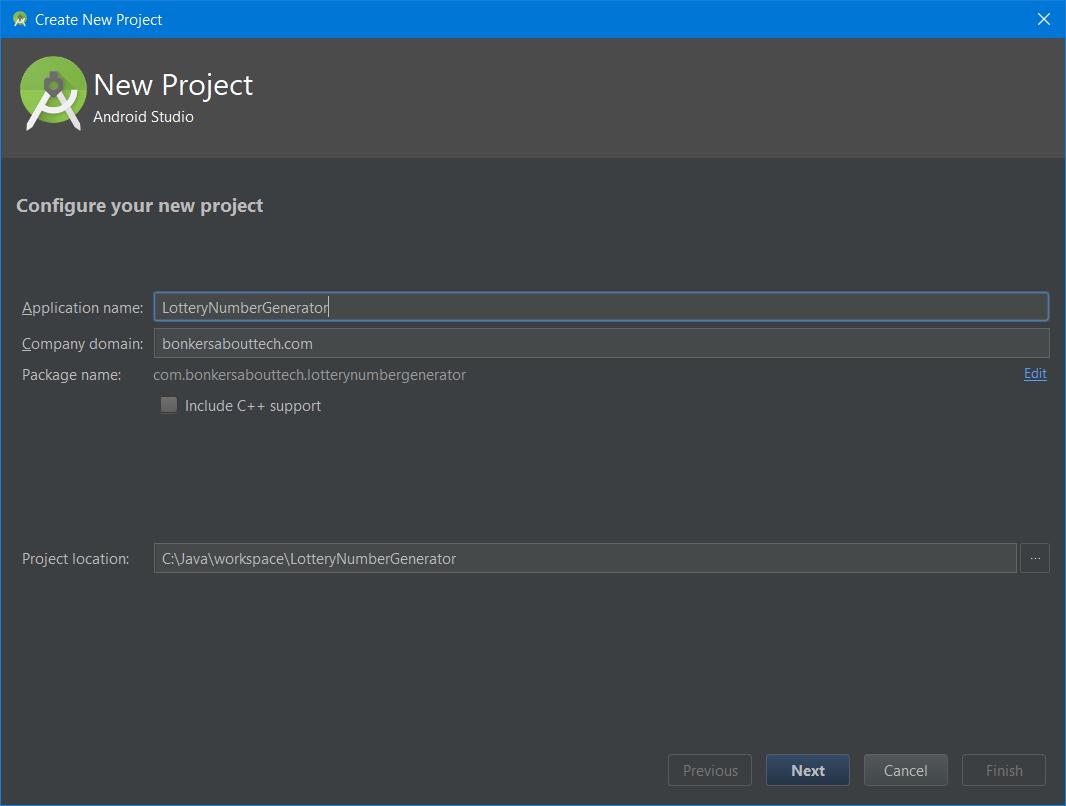
In the “Create New Project” window, enter the following:
Application name: LotteryNumberGenerator
Company Domain: bonkersabouttech.com or yourdomain.com
Once you’ve filled this in, hit next and move onto Instruction #4.
You can change the project location if you like, but leave everything else as above.
Instruction #4
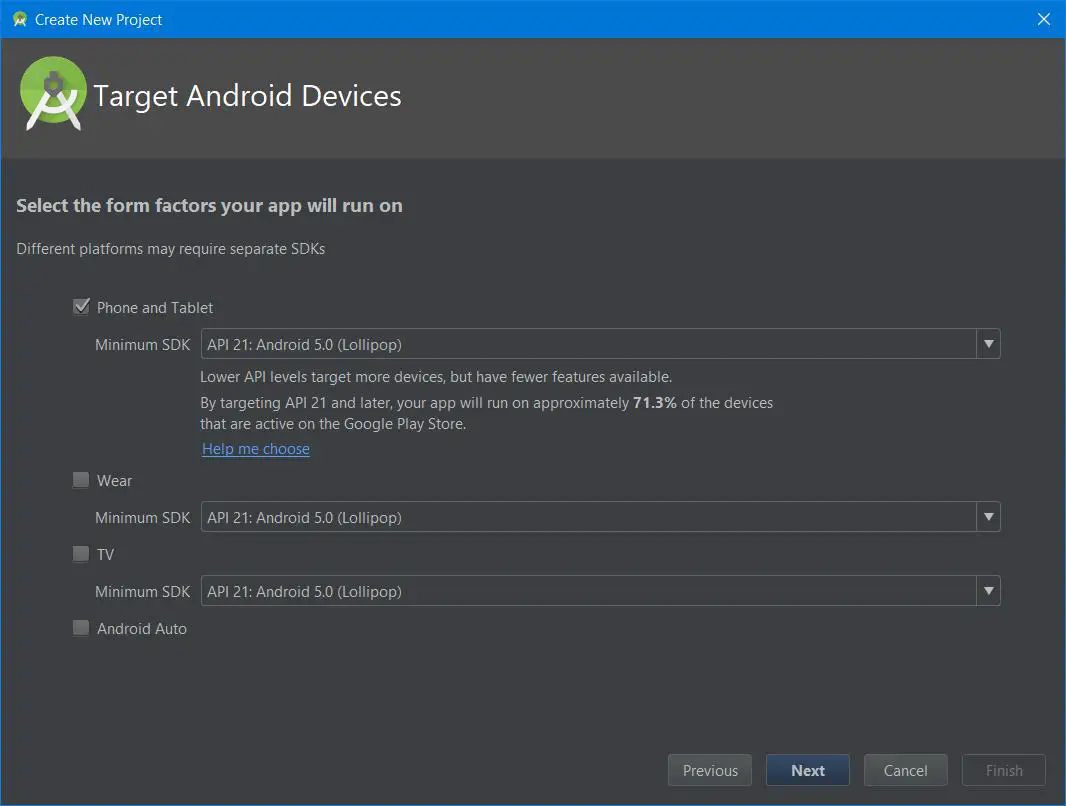
The next screen will ask you to select the form factors your app will run on. Basically, what you’re doing here is selecting what type of device and the version of the Android Operating System that you plan to run your app on.
Android runs on lots of devices including phones, tablets, TVs, watches etc and not only do they have different screen sizes and resolutions, each device will have a different version of the Android Operating System running on it.
Let’s keep things simple here and keep the default values and click Next.
Basically, we’re going to target phones and tablets only that are running Android 5.0 (API version 21) Lollipop. You’ve got to love the Android OS names by the way, they’re ace!
Instruction #5
On the next screen (Add an Activity to Mobile screen), simply choose Empty Activity and click Next.

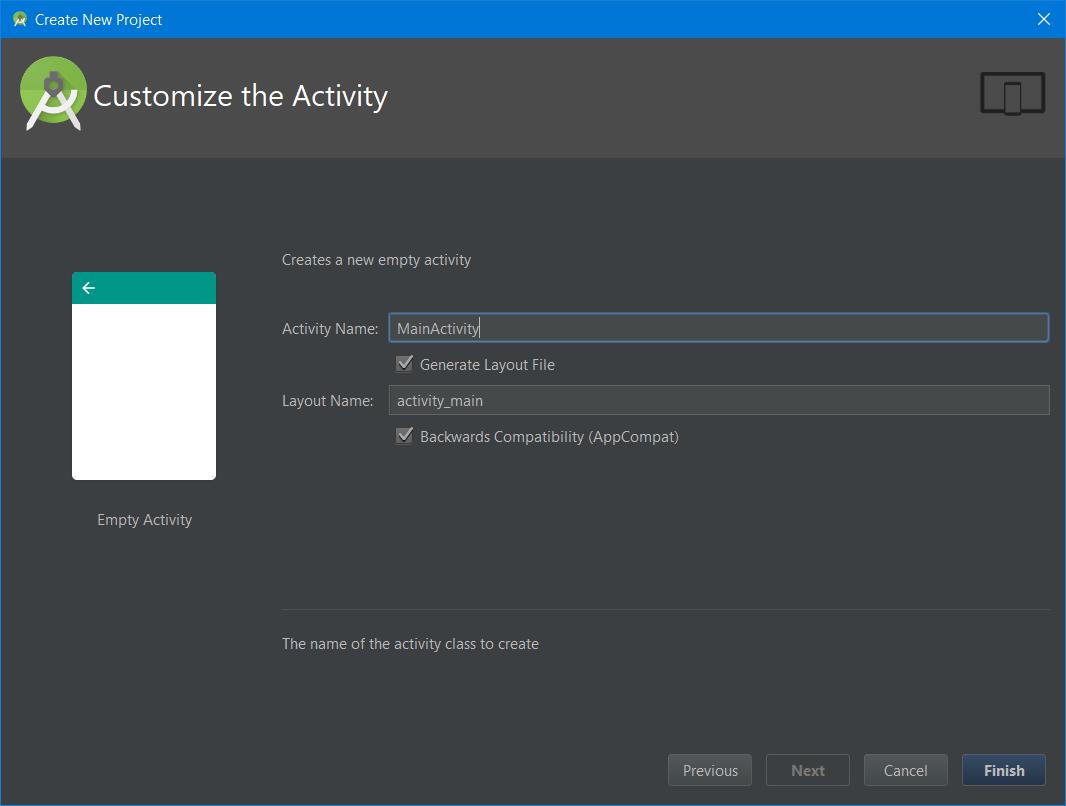
Instruction #6
On the next screen (Customize the Activity screen), keep the default values and click Finish.
What You Should Now See On Your Screen
OK, after you’ve hit finish, Android Studio should open the environment for developing your app, the IDE (Integrated Development Environment) in other words. If you’ve followed the instructions correctly, you should have a project structure like this:
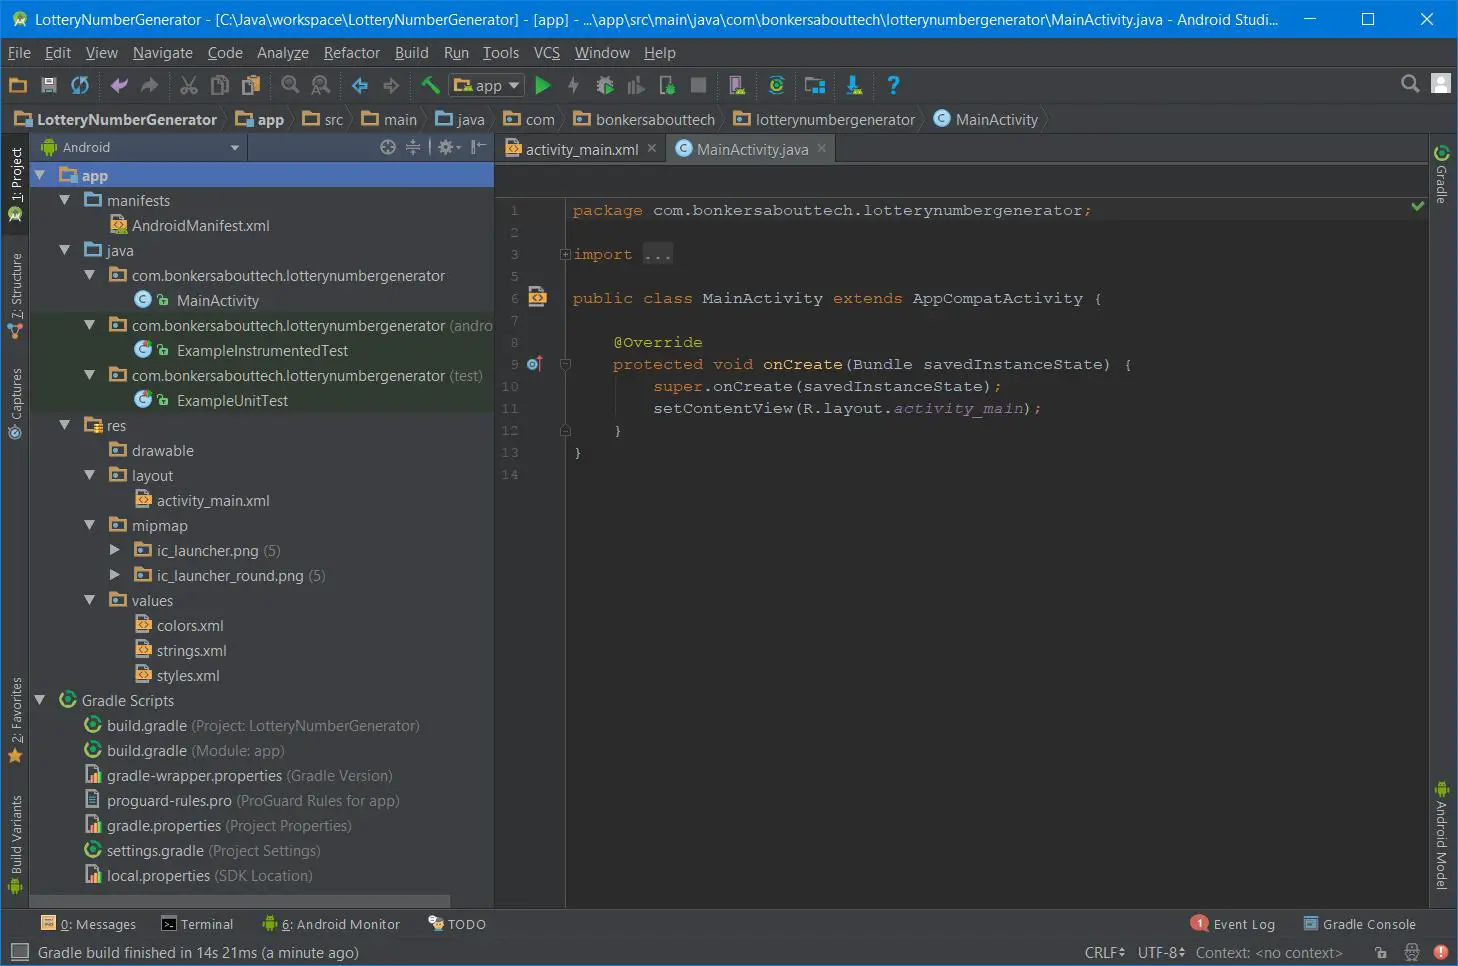
Now there’s a lot going on here and lots of tools. Don’t worry about them all for now, most of the tools you won’t need to use.
Instead, let’s focus on what Android Studio has created for us.
First, ensure that the Project window is open (select View > Tool Windows > Project) and that the Android view is selected from the drop-down list at the top of that window.
Let’s look at each file one by one.
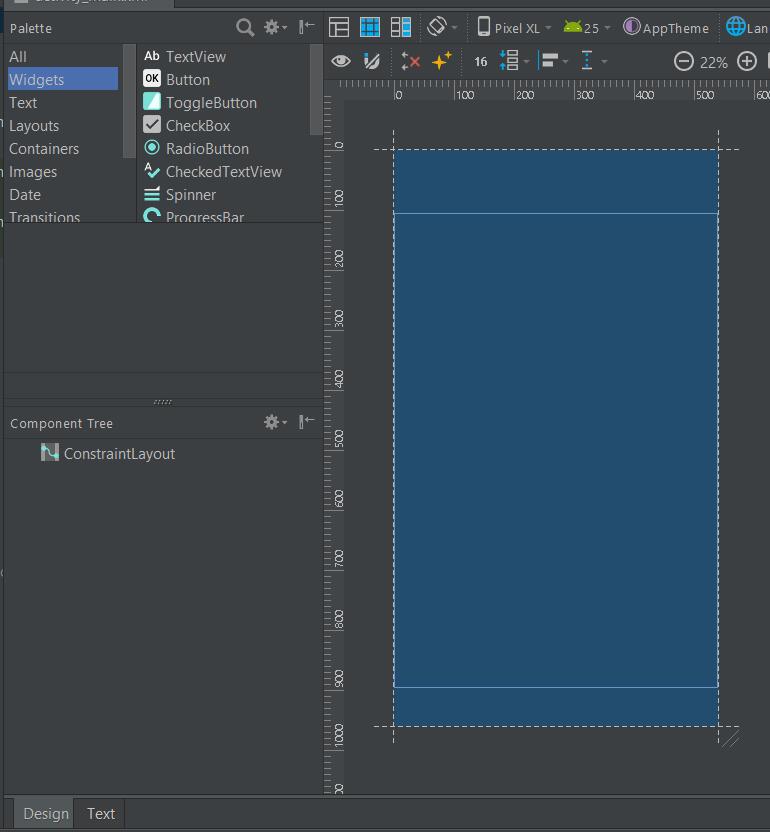
First of all, click on app > res > layout > activity_main.xml
<?xml version="1.0" encoding="utf-8"?>
<android.support.constraint.ConstraintLayout xmlns:android="http://schemas.android.com/apk/res/android"
    xmlns:app="http://schemas.android.com/apk/res-auto"
    xmlns:tools="http://schemas.android.com/tools"
    android:layout_width="match_parent"
    android:layout_height="match_parent"
    tools:context="com.bonkersabouttech.lotterynumbergenerator.MainActivity">

    <TextView
        android:layout_width="wrap_content"
        android:layout_height="wrap_content"
        android:text="Hello World!"
        app:layout_constraintBottom_toBottomOf="parent"
        app:layout_constraintLeft_toLeftOf="parent"
        app:layout_constraintRight_toRightOf="parent"
        app:layout_constraintTop_toTopOf="parent" />

</android.support.constraint.ConstraintLayout>
This file is an XML file and it describes the layout for our UI (User Interface). The layout is only applicable to one activity, but since our app will only have a single activity, then this is the layout that you will see when you run the app.
As you can see, there is a single TextView element in there with the text “Hello world!”.
This is pretty boring, so in the next section we’re going to replace the entire contents of this file with our own layout.
Next, click on app > java > com.bonkersabouttech.lotterynumbergenerator > MainActivity.java
This Java class is the main activity in our app (you can specfiy which is the main activity of your app in the Android manifest file). Apps can have many different activities but there is only one “main activity” which is the entry point for our app and it is the first activity that is executed by your phone when you start an app.
It doesn’t have to be named “MainActivity” by the way, you can name it anything you like, and you can specify a name for the class when creating a new project, but we’ll keep this name as it makes it obvious what the activity is.
When you run the app, the Android system will create an instance of this class in memory for us and it will load the layout that we’ve specified (activity_main.xml).
Next, click on app > manifests > AndroidManifest.xml
The manifest file has to be present in every Android app in the root directory. It provides essential information about your app, defines the permissions that your app requires, what activities are present in the app and in general, it is required by the system to run your app properly.
Finally, click on Gradle Scripts > build.gradle
There are two build.gradle files, one for the project and one for each module that you have in your application.
Our app only has one module, but as apps get larger, it’s useful to keep your code organized by creating multiple modules.
Your Gradle files (your build scripts) are used to tell Gradle (an automated build toolkit) how to build your application.
In the build scripts you basically define how your project should be built, what dependencies your project needs and basically what the end result of the build process should be.
If you want to find out more about gradle files, you can find out more here.
OK so we’ve looked at the main files within our application, let’s begin building our app. We’ll start by building the User Interface.
Building our User Interface
What we’re going to build now is build our User Interface (UI). This is the bit your users see and it’s how they will interact with your app.
The User Interface in Android is built up using a hierarchy of layouts and widgets. Layouts are ViewGroup objects and widgets are View objects.
Layouts dictate how views (like TextViews for example) are positioned on the screen. Widgets are UI components such as buttons and text boxes.
Most of the UI in an Android app is defined in XML files, although it is possible to build a UI programmatically in Java. In this guide, however, we’ll be using Android Studio’s built in Layout Editor, which is arguably easier than building out a layout in XML.
In our app, we’re going to be adding a button to generate our randomly generated number and a TextView to display our randomly generated number to the user.
In this section we’re going to build the UI and in the next section, we’re actually going to write some code to make the app respond to our button clicks.
Setting Up
To get setup and before we actually start adding buttons and things, you need to setup your workspace. To do this, just follow these steps, it will ensure that your layout behaves correctly and that we have some decent margins to make our UI look nice.
Instruction #7
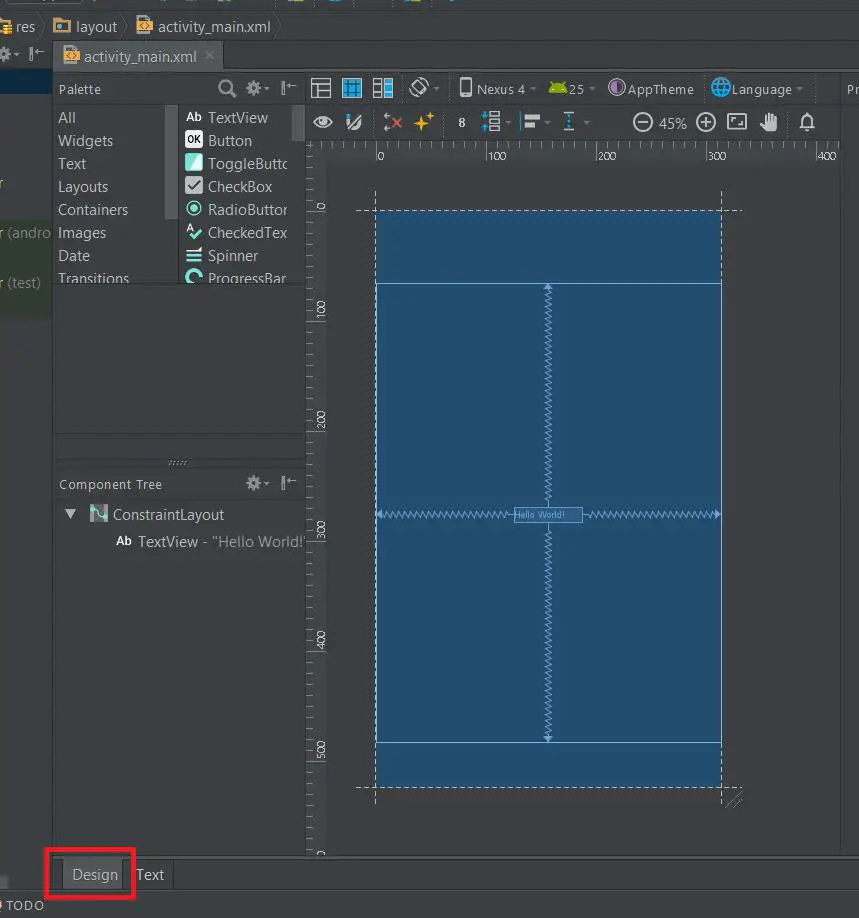
Ensure that the layout XML file is selected. If it’s not, select app -> res -> layout -> activity_main.xml
Instruction #8
Ensure that the Design tab is selected rather than Text.
Instruction #9
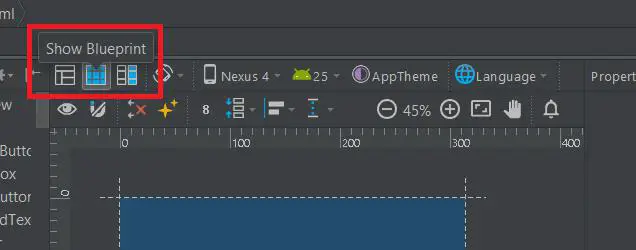
Click Show Blueprint so that you can only see the blueprint layout like in the image below.
Instruction #10
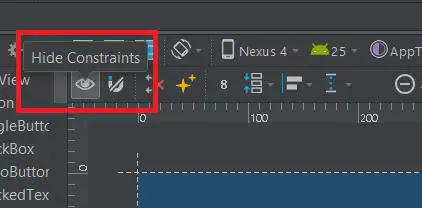
Make sure Show Constraints is on. You’ll be able to verify this by checking that the tooltip in the toolbar shows Hide Constraints.
Instruction #11
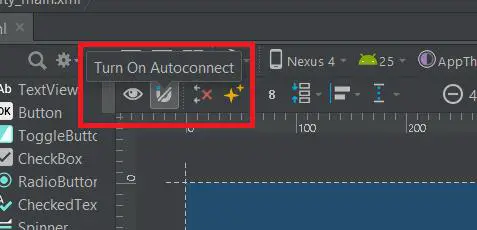
Make sure Autoconnect is off. Again, you’ll be able to verify this by checking that the tooltip in the toolbar shows Turn On Autoconnect.
Instruction #12
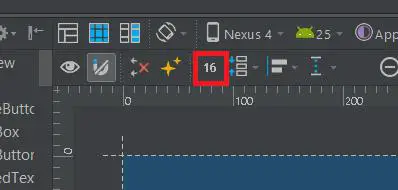
Click the Default Margin in the toolbar and change it from 8 to 16.
Instruction #13
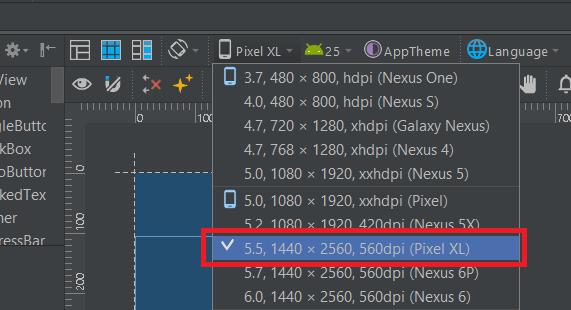
Finally, click Device in Editor in the toolbar and choose Pixel XL.
Explanation time
If you look at the image below, you’ll see a Component Tree window bottom-left. This window will show you how all your views are connected in a hierarchical fashion.
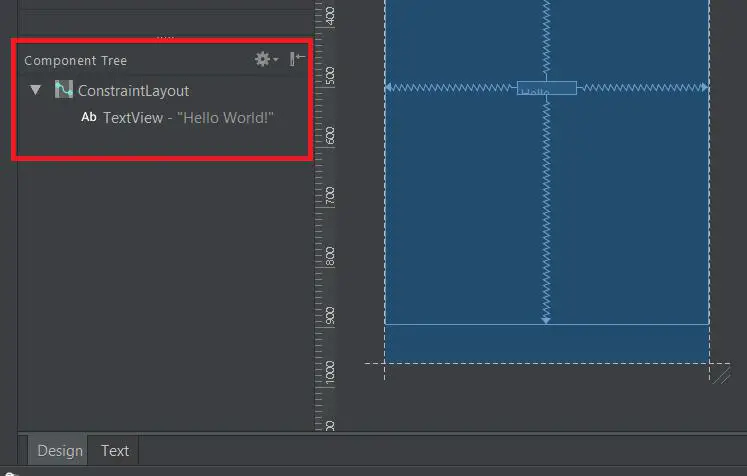
So, you can see that the root view is our ContraintLayout and its child view is our TextView.
ConstraintLayouts allow you to create both very simple and complex layouts without the need for complex nested layouts which are difficult to maintain and are resource intensive. They can take longer to draw on the screen.
This type of layout enables you to define positions for each of your components (TextView, Button, EditText etc) based on the parent layout and their constraints to sibling views.
Adding a TextView
The first component that we’re going to add is a TextView. This is going to be for a label. We’ll also add another TextView soon to display our random number.
Now let’s start from scratch and delete the TextView that’s already there, so we’ll see how to create constraints.
Instruction #14
Click the TextView and hit Delete on your keyboard. You should now have a blank layout like in the image below:
Instruction #15
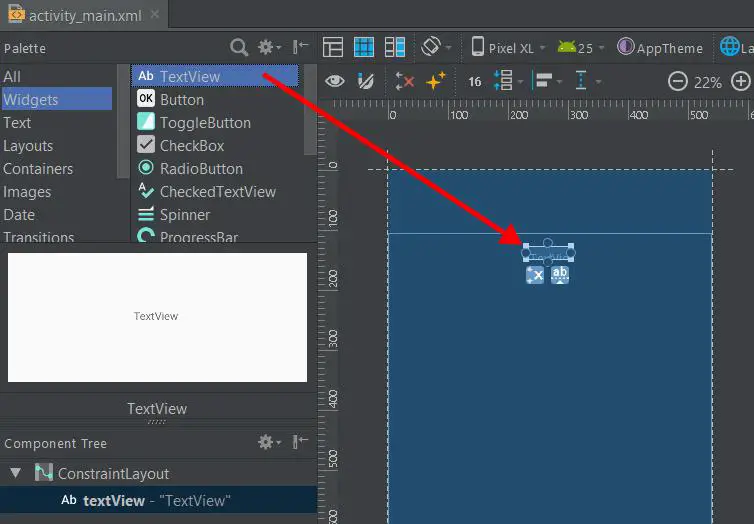
From the Palette window on the left, click Widgets in the left pane, and then drag TextView into the design editor and drop it near the top of the layout.
Instruction #16
Click the TextView in the design editor. You should see squares on each corner. These are for resizing your TextView. You should also see circles on each side. These are the constraint anchors which will enable you to position your TextView within the layout (see image above).
Instruction #17
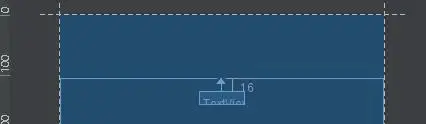
Click and hold the anchor (the circles) on the top side of your TextView, then drag it up to the top of the layout and release it. You’ve just created a constraint. Basically, it specifies that the TextView should be 16dp (density independent pixels for supporting screens of varying resolution) from the top of the layout. (Remember, we set the default margins to 16dp when we were getting set up).
Instruction #18
Now, similar to the previous instruction, create a constraint for the left-hand side of the view to the left side of the parent layout.
You should have something that looks like the following:
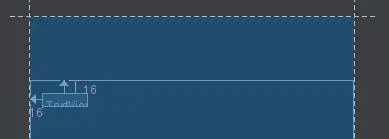
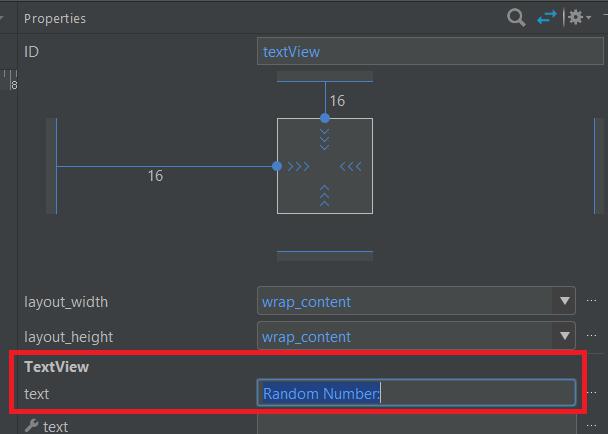
OK, so now we’ve created a TextView which is going to act as a label. Let’s add some text to it for the user.
Instruction #19
Click on the TextView and in the Properties window on the right, you should see the word “text” with a value of “TextView”. You can edit this value and put whatever label you like. But let’s make it something meaningful like “Random Number: “. Now this is hardcoded at the moment and in a real Android app, you might have several of these strings, so it’s a good idea to keep them together in one place.
Luckily Android has a solution for this and strings are generally defined in a strings.xml file in the resources folder. We’ll come onto this later and tidy up, but for now we’ll leave it as it is.
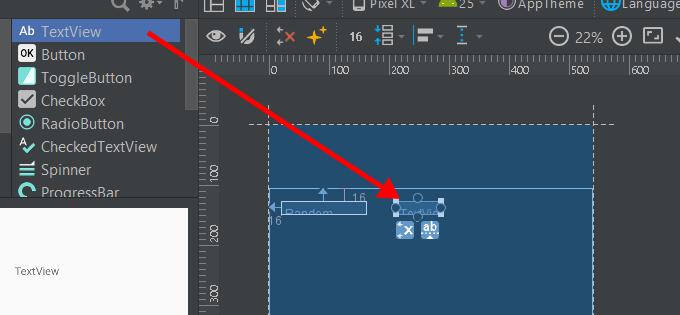
The next thing we’re going to create is another TextView to display our random number which will be generated by our code and displayed dynamically in this TextView.
Adding our random number TextView
In this section, we’re going to add a second TextView which will actually display our random lottery number and it will sit alongside our label TextView.
Instruction #20
Like you did before, head over to the Palette window on the left, click Widgets in the left pane, and then drag another TextView into the design editor and drop it near the right-hand side of our first TextView.
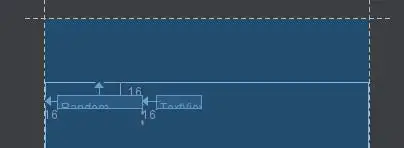
Instruction #21
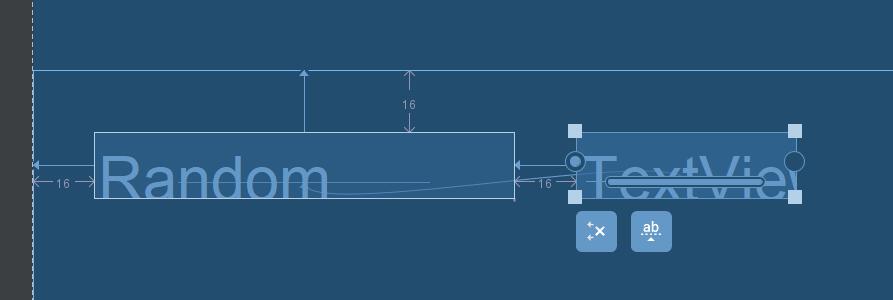
Create a constraint from the left-hand side of the second TextView to the right-hand side of the first TextView.
Instruction #22
Now, to constrain the views so that they are both aligned horizontally, we can create a constraint between the text baselines. To do this, click the second TextView and click Baseline Constraint, which is the icon that appears directly below the TextView that you’ve just selected.
![]()
A baseline anchor will appear inside this TextView. Click and hold this anchor and drag it over to the baseline anchor that appears in our first TextView (the label).
When you’ve done this, you should have something that looks like the following:
Adding Our Button
In this section, we’re actually going to add our Button and later on, we’ll hook it up to the Java code so that it generates our random number.
Instruction #23
Like you did before, head over to the Palette window on the left, click Widgets in the left pane, and then drag a Button into the design editor and drop it somewhere below our TextViews.

Instruction #24
Create a constraint from the left-hand side of the button to the left-hand side of the parent layout.
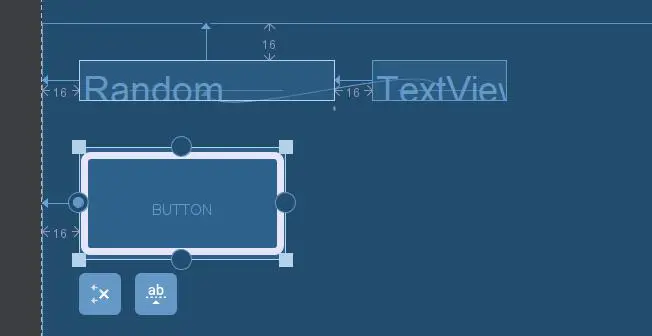
Instruction #25
Create a constraint for the top of the button to the bottom of the first TextView.
Instruction #26
In the Properties window on the right, you should see the word “text” with a value of “Button”. Again, you can edit this value and put whatever label you like. But let’s make it something meaningful like “Generate Lottery Number”. Again this is hardcoded for now and we’ll replace it with a string in the strings.xml file soon.
Implementing responsiveness
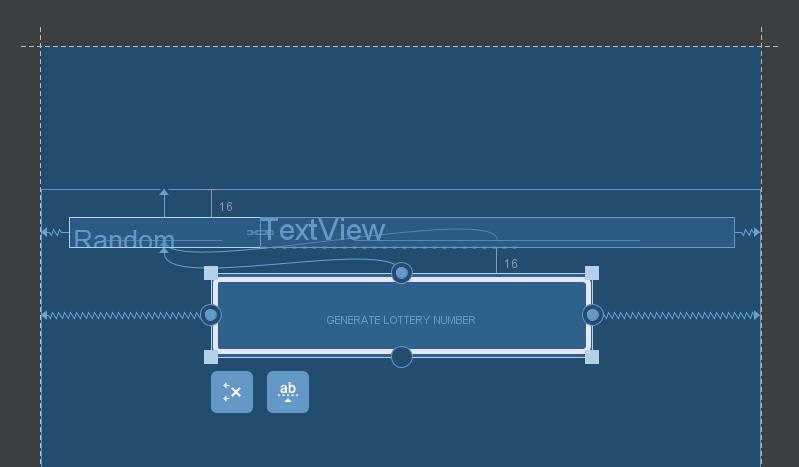
Now the Android operating system is designed to work on many devices with different shapes and sizes and many different screen resolutions. So, to create a layout that’s responsive to different screen sizes, we’re going to make the TextView which will contain our random number stretch to fill all remaining horizontal space (after accounting for the button and margins). We do this by creating a chain.
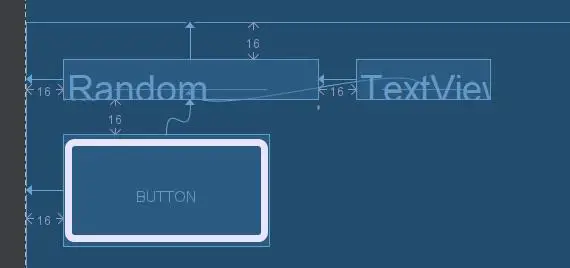
Instruction #27
Select both of our TextViews (click one, hold Shift, and then click the other), and then right-click either TextView and right-click one of the views, and then select Center Horizontally.
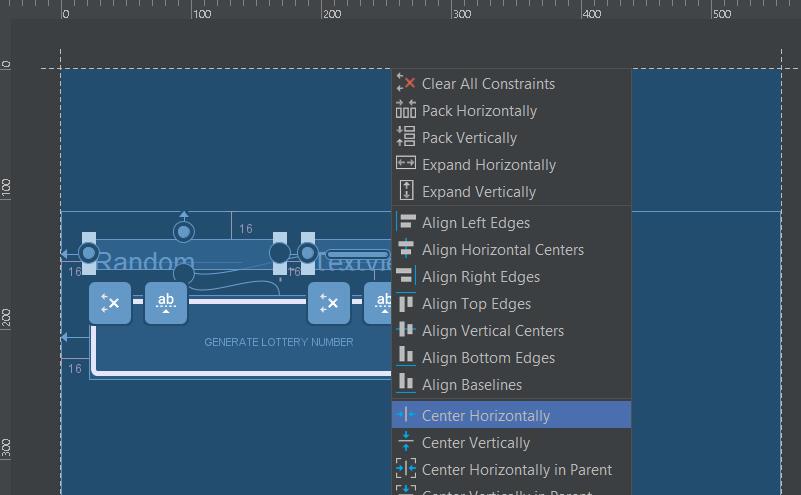
You should now have the following:
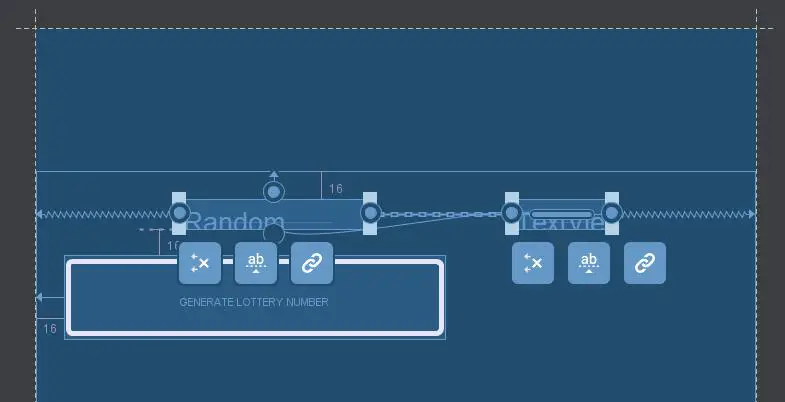
Instruction #28
Select the second TextView and in the properties on the right, scroll to the top and set the right margin to 16.
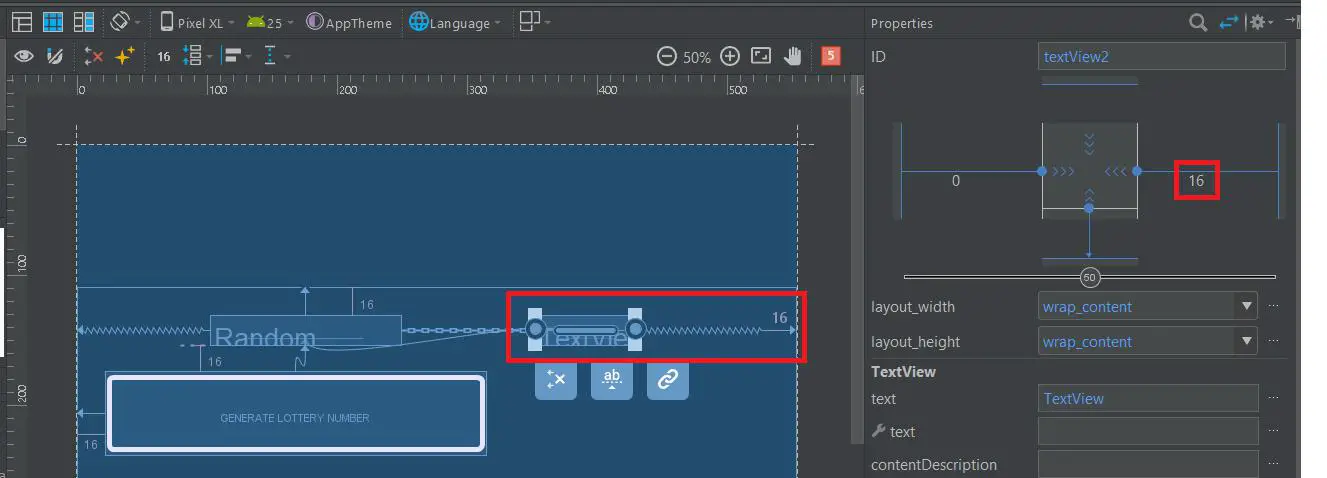
Instruction #29
Now with second text box selected, click the width indicator twice (red box in properties, see below) so that it is set to Match Constraints.
![]()
“Match constraints” basically means that the width expands to meet the definition of the horizontal constraints and margins. Therefore, our TextView stretches to fill the horizontal space (after accounting for the button and all margins).
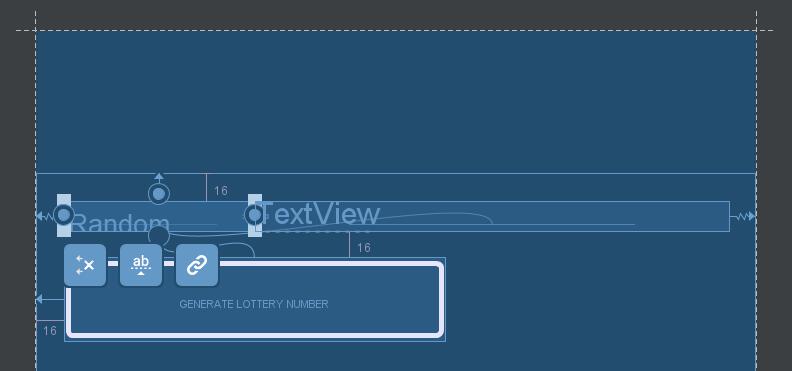
Note, at this point you may have to recreate the constraint from the left side of the first TextView to the edge of the parent layout.
Once you’re done, you should have something that looks like the following:
Instruction #30
Next right-click on the button and select Center Horizontally. This will center the button.
Now our layout is done and it should appear as shown below:
If your layout did not turn out as you wanted it to, click the link below to see what your the XML should look like and compare it to what you see in your Text tab. (If your attributes appear in a different order, then that’s okay.)
For more information about chains and allsorts of other good stuff you can do with ConstraintLayout, read Build a Responsive UI with ConstraintLayout. Another good tutorial to go through is this ConstraintLayout Codelab by Google.
Create UI Strings
Now that we’ve added our TextViews and our Button, as promised, we’re going to replace our hardcoded text and replace them with Strings which will help keep things organised.
Instruction #31
In the project window on the left-hand side, open up your layout XML file by going to app -> res -> layout – >activity_main.xml
Select the Text tab at the bottom (previously we were using the Design view).
Instruction #32
Scroll to the top of the file and position your cursor anywhere on the following line:
android:text="Random Number:"
Then press ALT + ENTER and move onto the next instruction.
Instruction #33
Once you’ve pressed ALT + ENTER, Android studio should then popup a menu with a number of suggestions. Click on Extract string resource.

Instruction #34
In the dialog that pops up, it gives you the option to create a name for your string, a value for your string and a filename in which your strings will be stored. Click OK and accept the defaults.
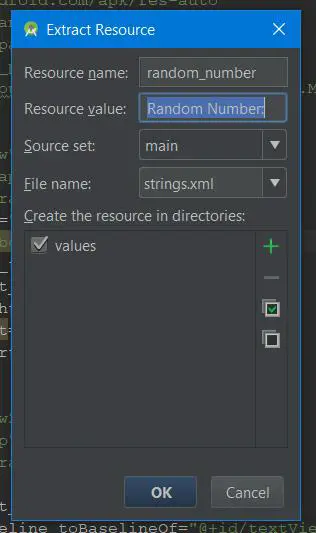
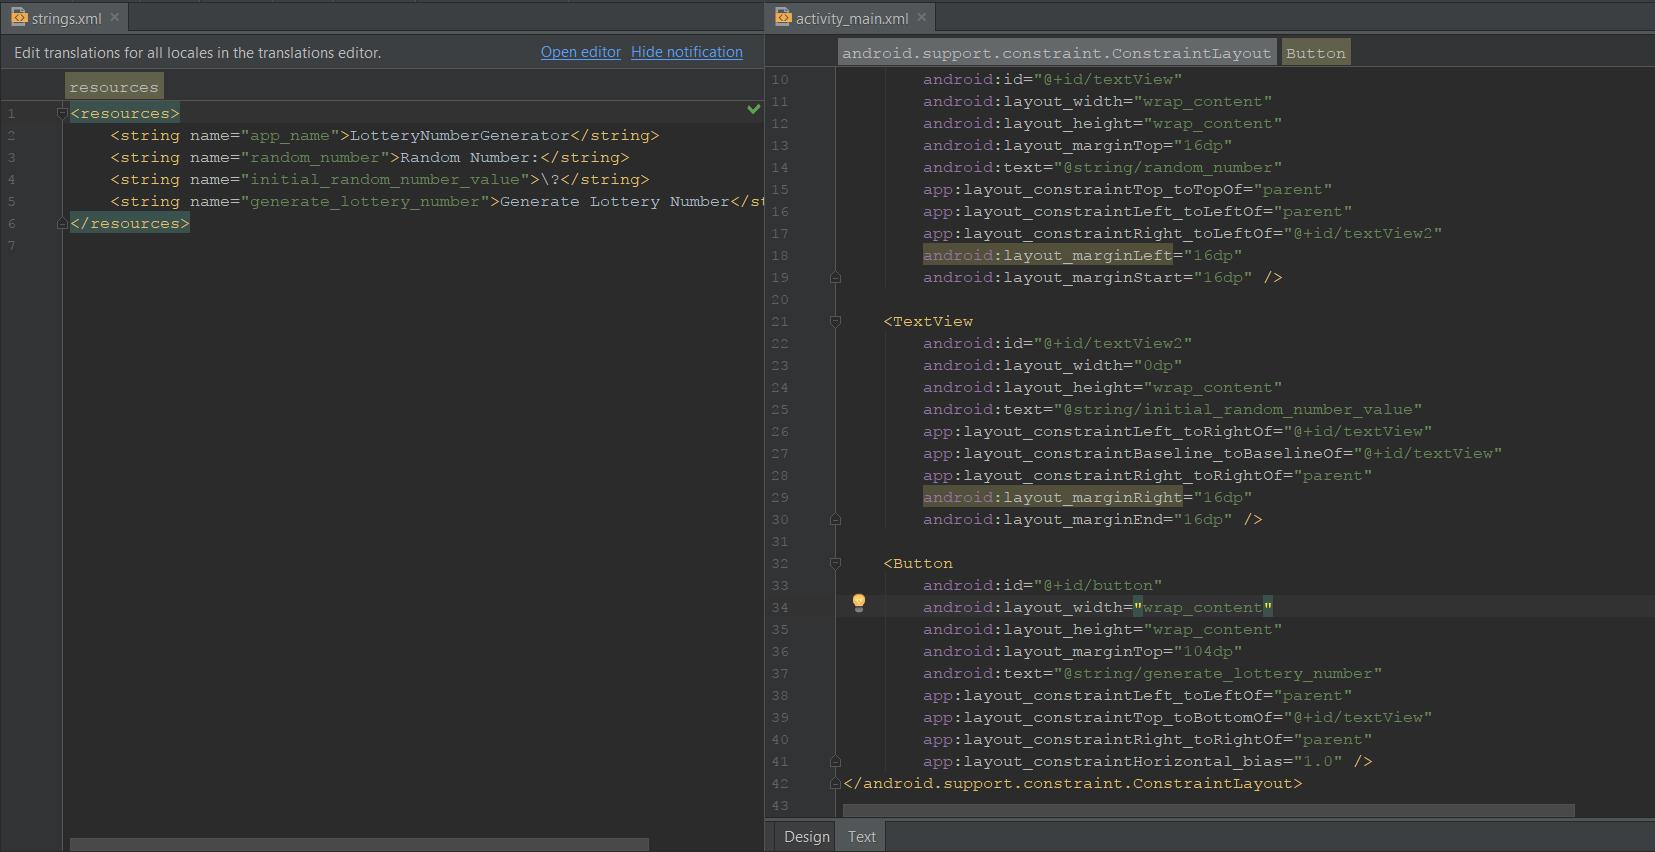
You’ll notice now that a string resource has been created for you in the strings.xml file. You can take a look at your string in app -> res -> values -> strings.xml

Your strings.xml is a file that stores all the strings that you’re going to use throughout your application in your user interface. The good thing about this file, is that it keeps strings in one place so that you can easily reuse, find, update and translate them. Otherwise, you’d have to hard-code the strings in your layout code or app code which would quickly become hard to maintain.
Instruction #35
Now follow the instructions above and extract the string for the button and the other TextView although the value that you use for the random number TextView will actually be replaced every time you press the button. However you can set the initial value for your random number TextView and add it to your strings.xml.
Here’s the extracted string values and my layout XML side-by-side. You can also check out my strings.xml and my activity_main.xml if things didn’t go to plan for you.
Writing some code for our button
Finally we have come to the most exciting part of our application – writing some code!
In this section, we will write some code that will execute and spring to life when our user presses the button.
When the user presses the button, our app will do two things:
- Generate a random number (let’s call it X)
- Take our random number X and display it on our
TextView
Instruction #36
Add a method in MainActivity.java. This method will be called when someone presses our button. So to do this, go to app > java > com.bonkersabouttech.lotterynumbergenerator> MainActivity.java and add the generateAndDisplayLotteryNumber() method as shown below:
public class MainActivity extends AppCompatActivity {

    @Override
    protected void onCreate(Bundle savedInstanceState) {
        super.onCreate(savedInstanceState);
        setContentView(R.layout.activity_main);
    }

    /** Called when the user taps the Generate button */
    public void generateAndDisplayLotteryNumber(View view) {
        // Do something in response to button
    }
}
You may notice that the View word is highlighted in red. All errors that are highlighted in red are compiler errors and it is because Java and Android Studio cannot resolve the View class used as the method argument.
To fix the error, place your cursor on the View declaration, and then perform a Quick Fix by pressing Alt + Enter (or Option + Enter on Mac). If a menu appears, don’t worry, just select Import class.
Explanation time
The first line in the onCreate method which is super.oncreate(savedInstanceState); simply calls the onCreate method in the AppCompatActivity class which our MainActivity class has extended. If you don’t call this method, you’ll get compiler errors because this method expects us to call the super class method if we have overridden it, which we have.
I highly recommend reading everything about method overloading vs. method overriding. I also highly recommend reading about the keyword super and Interfaces and Inheritance. Once you do, the code you have written will make much more sense to you.
The second line of code setContentView(R.layout.activity_main); basically tells the Android system that it should use our activity_main.xml as the layout for our activity (MainActivity.java).
Instruction #37
Now, head over to the activity_main.xml file again to link a button click to your code (the generateAndDisplayLotteryNumber method):
First of all, ensure that the Design tab is selected rather than Text and click to select the button in the Layout Editor.
In the Attributes window on the right, locate the onClick property and select generateAndDisplayLotteryNumber[MainActivity] from the drop-down list.
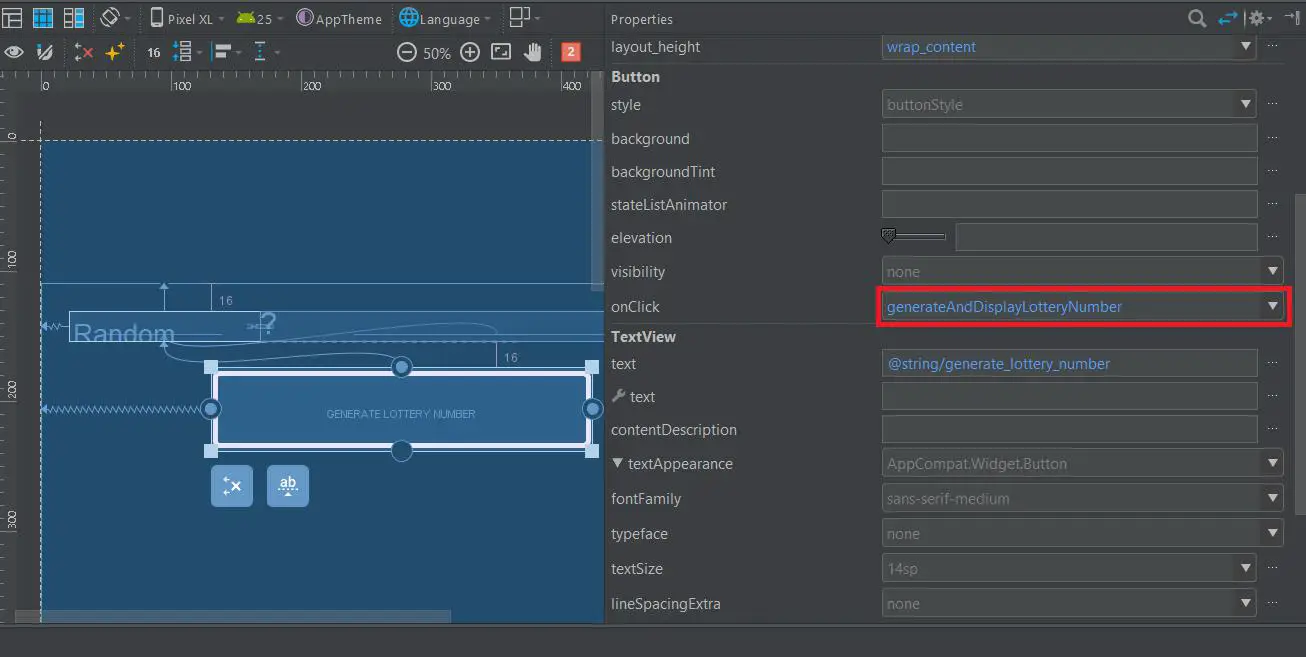
Now when the button is tapped, the system will call our generateAndDisplayLotteryNumber() method.
Now in order for everything to work correctly and for our code to execute, there are a number of details to take notice of that are required in order for the system to recognize our method as compatible with the android:onClick attribute.
Basically, our method must declare the following:
- Public access
- A void return value
- A
Viewas the only parameter (it is theViewobject that was clicked)
Because our method is declared as public void generateAndDisplayLotteryNumber(View view), the system’s requirements are satisfied and our method should fire when the user presses the button.
Next, we will write some code to actually generate a random number and display it on our TextView.
Generating the random number and displaying to the user
OK, so we’ve written some code which will trigger when the user presses our button. But at the moment, it doesn’t do very much. Our method generateAndDisplayLotteryNumber() gets executed but there’s no actual logic inside our method yet.
So now we’re going to write some code to generate a random number and display it on our TextView.
Instruction #38
Because the US Powerball lottery balls go from 1 to 59, add some code to generate a random number between 1 and 59. So in our generateAndDisplayLotteryNumber() method, add the following code:
public class MainActivity extends AppCompatActivity {

    @Override
    protected void onCreate(Bundle savedInstanceState) {
        super.onCreate(savedInstanceState);
        setContentView(R.layout.activity_main);
    }

    /**
     * Called when the user taps the Generate button
     */
    public void generateAndDisplayLotteryNumber(View view) {
        // Generate a random number between 1 and 59 and store in our variable called "randomNumber"
        int randomNumber = generateRandomNumber(1, 59);
    }

    // Our private method called "generateRandomNumber".  It accepts two arguments "min" and "max"
    // and returns a random integer between "min" and "max".
    private int generateRandomNumber(int min, int max) {
        Random random = new Random();
        return random.nextInt(max - min + 1) + min;
    }
}
Explanation time
OK, so a little explanation here. When the user clicks the button, the generateAndDisplayLotteryNumber() method is called. When this method is called, a private method named generateRandomNumber() is called immediately after. The generateRandomNumber() method creates a new instance of a class called Random and then calls the method nextInt on our object named random passing in our minimum and maximum ranges as method arguments. Finally our random number is returned from the method as an integer and stored in our variable called randomNumber.
Instruction #39
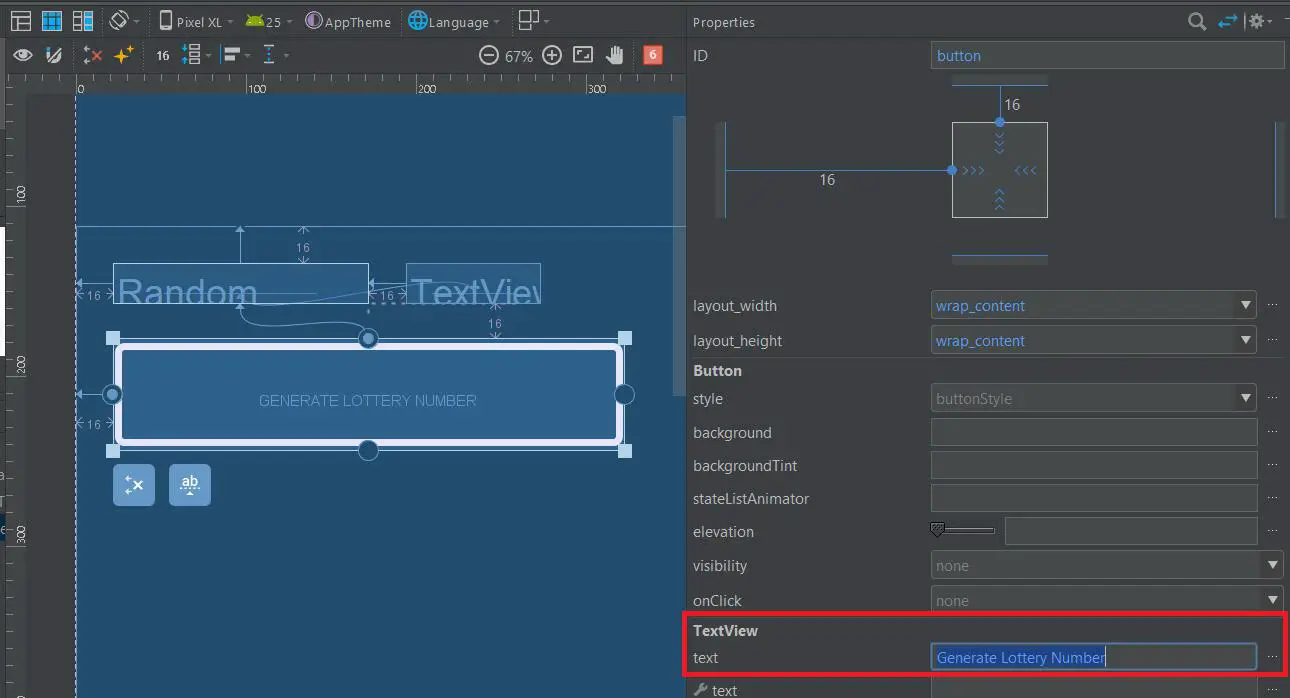
Next we’re going to take our randomly generated number and display on our TextView for the user to see. But before we do, we need to give our TextView an identifier in our layout XML that makes a bit more sense than it’s default of TextView2.
So head over to the activity_main.xml file again and in the Text tab replace every instance of textView2 with randomNumberTv.
Instruction #40
Now that we’ve given our TextView an identifier that makes a bit more sense, head over to your MainActivity.java and add the following code:
public class MainActivity extends AppCompatActivity {

    @Override
    protected void onCreate(Bundle savedInstanceState) {
        super.onCreate(savedInstanceState);
        setContentView(R.layout.activity_main);
    }

    /**
     * Called when the user taps the Generate button
     */
    public void generateAndDisplayLotteryNumber(View view) {
        // Generate a random number between 1 and 59 and store in our variable called "randomNumber"
        int randomNumber = generateRandomNumber(1, 59);

        displayLotteryNumberToUser(randomNumber);
    }

    private void displayLotteryNumberToUser(Integer randomNumber) {
        TextView randomNumberTv = (TextView) findViewById(R.id.randomNumberTv);
        randomNumberTv.setText(randomNumber.toString());
    }

    // Our private method called "generateRandomNumber".  It accepts two arguments "min" and "max"
    // and returns a random integer between "min" and "max".
    private int generateRandomNumber(int min, int max) {
        Random random = new Random();
        return random.nextInt(max - min + 1) + min;
    }
}
Explanation time
OK so immediately after our generateRandomNumber() method is called, another private method named displayLotteryNumberToUser() is called, passing our random number as an argument.
It’s a good idea by the way to name your methods clearly and concisely so that anyone looking at the code will know exactly what the method is doing. That way you don’t need comments above the methods (anything with // in front of it or anything between /* */ is a comment). I have however included a couple of comments as a means of explaining things so that they are crystal clear for the purposes of this tutorial.
Our displayLotteryNumberToUser() method does two things. The first thing it does is call the findViewById()method which give us a pointer to our TextView which has the identifier that we set earlier which was “randomNumberTv”. This object that the findViewById() method returns allows us then to manipulate our TextView and set values on it and display our randomly generated lottery number to the user.
Once we have a handle on random number TextView, we call setText() on our randomNumberTv object which will actually render our random number on our TextView for the user to see. Note that we are using the toString() method on randomNumber because the setText() method expects a CharSequence type which is similar to a String.
Running your Android app
Finally finally finally we are at a stage where we can see the fruits of our labour and see our Android app in action!
I recommend getting hold of a real Android device to do this because 1. it’s more fun and 2. I have found real devices to be more performant than the emulator, especially when you’re developing an Android app of reasonable complexity.
If you wish to use the emulator, then read run on an emulator, but to get up and running on a real device, follow these instructions:
Instruction #41
Ensure that the USB drivers for your Android device are properly installed and connect your device to your development machine with a USB cable.
Instruction #42
Enable the developer options:
- Open the Settings app on your Android device.
- (Only on Android 8.0 or higher) Select System.
- Scroll to the bottom and select About phone.
- Scroll to the bottom and tap Build number 7 times.
Instruction #43
Return to the previous screen to find Developer options near the bottom. Then, open Developer options, and then scroll down to find and enable USB debugging.
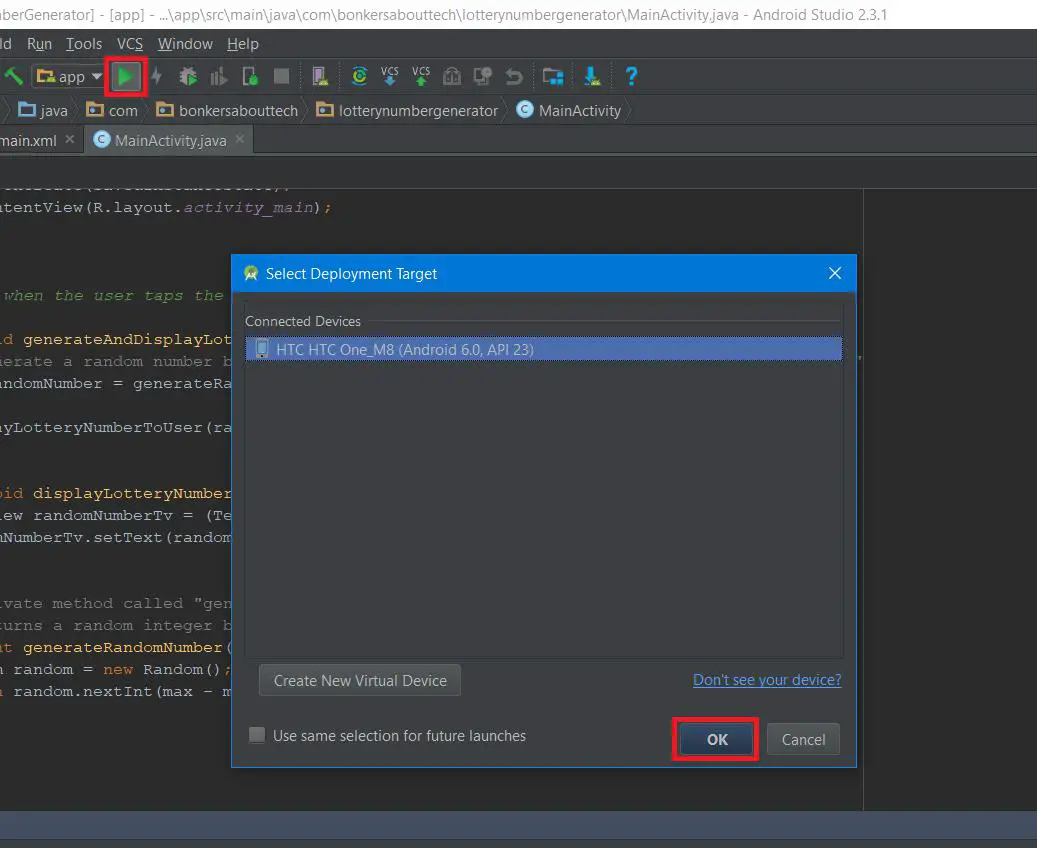
Instruction #44
To run the app on your device, click the app module in the Project window and then select Run > Run. Or you can just click the green play button (see below).
Either way, your app will compile and build and if you done everything correctly, the APK should be packaged up and downloaded to your phone and your app should start!
Optional extras
If you’ve got this far, give yourself a pat on the back, you deserve it. If want to stop here that’s fine but if you’re hungry for a little more, here’s some extra stuff you can do and more resources that you’ll find beneficial if you want to take your new found skills that bit further.
Taking the app further
There’s loads of ways you can take this app further. Here’s some ideas to get you started:
- Add multiple TextViews or a single
TextViewbut generate multiple random numbers and display them to the user. - Experiment with Intents. Intents basically allow you to start a another activity. Generally you create a new activity for each new screen you wish to display to the user. Creating a new Intent isn’t difficult, but it’s worth reading it here. You can pass information and data to your new activity from your old activity too.
Changing the theme
One of the great things about Android is that you have complete control over a lot of things, and the look and feel of your app is no exception. You can make your app look however you like and Styles and Themes are the tools you need to use to make it happen.
Start small though and just change the theme that your app uses. To do that, got to app -> res -> values -> styles.xml and change the “parent=” value to be:
parent="Theme.AppCompat.Light.NoActionBar"
This just changes the App theme and removes the action bar at the top of the app, but experiment and and try changing it to use other themes.
Useful Android resources
Here’s a list of Android resources that I think you might find useful:
- Beginning Android Resources
- Activity Lifecycle – Learn this
- Fragments – Learn this
- More Fragments – Learn this
- Dialogs – Learn this
- Navigation Drawer – Learn this
- Toasts – popups – Learn this
- Android development subreddit
Useful Java resources
- Really good introduction to Java
- MkYong – awesome programming blog with loads of examples
- Java Code Geeks – awesome resource for Java developers (full of guides, tutorials, tips etc)
- Javarevisited – great site covering everything from core Java, through to Spring, Hibernate and general Object Oriented Programming (OOP).
- GitHub – 21.8 million repositories of open-source code to learn from and contribute etc.
- StackOverflow – Question and answer forum for developers of all languages (essential when you get stuck!)
Useful Android books
- Android Application Development All-in-One For Dummies (Amazon, #CommissionsEarned)
- Head First Android Development: A Brain-Friendly Guide (Amazon, #CommissionsEarned)
- Android: App Development & Programming Guide: Learn In A Day! (Amazon, #CommissionsEarned)
Useful Java books
- Java: A Beginner’s Guide (Amazon, #CommissionsEarned)
- Head First Java (Amazon, #CommissionsEarned)
- Java: The Complete Reference (Amazon, #CommissionsEarned)
Adding and using third-party libraries
Libraries make your apps more fun by making them do more, with minimal effort. Libraries are files containing pre-written code that you can use out of the box, so you don’t have to do everything yourself from scratch. There’s libraries for pretty much everything (within reason), especially for common things like manipulating files, reading MP3’s, creating custom Toasts, a movie seek bar to name but a few.
So instead of writing a bunch of code to do something and reinventing the wheel, why not include a library in your app and leverage someone else’s hard work (as long as you have permission and it’s open-source etc).
So for example, with Toasty, once you have added the appropriate library to your Android project, you can create custom Toasts with just a single line of code:
Toasty.error(yourContext, "This is an error toast.", Toast.LENGTH_SHORT, true).show();
Toasts by the way are those little messages that you might have seen that popup in certain apps at the bottom of your screen.
Google also provides libraries specifically for Android such as the Support Library, so that you can use newer Android features like the navigation drawer on older devices for example.
You can find a number of Android Libraries to use in your project here and here.
Read how to add Android libraries if you want to know how to add external libraries (also known as dependencies) to your Android project.
Using third-party API’s
Android apps start to become even more useful when they start talking to third-party API’s. API’s have a similar effect to libraries in that they you can use someone else’s code and reap the benefits without having to write it yourself. The difference is, the third-party code doesn’t live in your app, it’s hosted externally on a server somewhere and you access the resource by making HTTP requests to it like GET, PUT, POST, DELETE etc.
If you’d like to know more about API’s, read this API Explainer and it should make more sense.
If you’re going to use API’s in your Android app, you’re going to need to know how to make HTTP requests. Third-party API’s are often RESTful which is basically a simple way for systems to communicate with each other over a network such as the Internet.
I recommend reading a beginner’s guide to HTTP and REST which should give you a good understanding of these two concepts.
If you’d like to have a go at making a request to a third-party API, I recommend reading Android AsyncTask HTTP GET request Tutorial on Medium which explains it very well.
If you’re not sure which API you want to use, then most of the major companies offer them such as Google, Facebook, Twitter, Spotify etc. But there’s a directory of API’s you can search if you’re looking for something in particular to integrate with.
Pro tips
- Learn and understand Java using the resources I’ve linked to and YouTube
- Learn how to write unit tests for Android so that you can fully test your code in isolation.
- Don’t use comments in your code to explain what your code does, your methods names should do all the talking. You can however use comments to explain why you have written code in the way that you have to help other developers understand your reasoning.
- Use fragments and make sure your app works on a variety of Android versions and devices.
- Extract out large sections of code into their own methods or even into their own classes to make the code easier to understand by other people.
Wrapping up
Wow! That’s just about it, I appreciate it’s a long post, but you don’t have to go through it in one sitting, bookmark it and come back to it later. We’ve covered a lot ranging from creating a basic User Interface for our app, to integrating the UI with our Java code and finally I talked about taking the app further with third-party libraries and API’s. But this is the absolute basics, and I’ve only really scratched the surface really with what Android can do. If you wish to pursue Android development and even get an app onto the Google Play Store then go through the resources I’ve recommended, learn Java and then start looking at fragments, styles for the UI etc.
See also: 15 Reasons To Root Your Android Phone
If you have any questions or comments, please let me know in the comments below, and I’ll answer your questions as soon as I can. I am a Java developer by trade, so I should be able to answer most of your questions. Also, the complete code for this tutorial is available on GitHub.
As always, if this guide has been beneficial to you, then please share with your friends etc on social media.
Cheers!
