Credit: Family O'Abé/Flickr
In this guide, I'm going to show you how to root your android phone without a PC or computer. It's very simple, and involves just one click once you have downloaded the software. But before jumping right into it, lets look at what rooting is and what some of the benefits are of rooting your android device.
What is rooting?
Well rooting ultimately gives you root permissions on your phone. It’s similar to running programs as administrators in Windows, or running a command with sudo in Linux. Once you have rooted your phone you can do that little bit extra with it such as run apps that require access to certain system settings, flash custom ROMs to your phone (modified versions of Android), automate everything on your phone and basically truly own your own device. For more advantages to rooting your phone, check out this list of the top 10 reasons to root your Android phone.
See also: How To Encrypt Your Android Phone
How to root Android without PC With A One Click App
So you've made the decision to root your phone and you've understood that it will void the warranty. Great, let's begin.
So we'll be using an app called KingRoot which is a one-click rooting tool by XDA Developers' senior member, Kingxteam. The app supports a bunch of Samsung, Google/Nexus, HTC, ZTE, Sony, LG and Huawei devices but for a more comprehensive list, click here.
Step 1
Enable installation of apps from unknown sources in your device by following this path: Settings -> Security -> Device Administration -> Unknown Sources.
Step 2
Download the KingRoot app onto your Android phone, ignoring any warning messages and proceed with the download of the kingroot.apk onto your phone.
Step 3
Once downloaded, install the application in your phone.
Step 4
Once installed, open up the application and you should see a message saying "root access is unavailable". Click the button below this message, which is the "try to root" button to begin the rooting procedure.
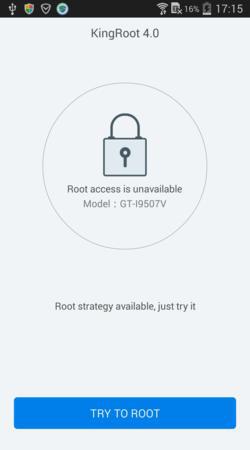
Credit: XDA
Step 5
Once your Android phone is rooted, you should see the message "Root Successfully" in the KingRoot app.
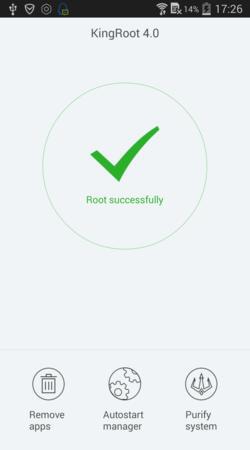
Credit: XDA
Step 6
To finish the rooting procedure, just restart your device.
So there you go, you have a fully rooted Android phone. To check the procedure worked, you can use a Root Checker app which you can download from the Google Play store. This will check the root privileges of your smartphone. Remember this procedure WILL void the warranty on your phone but there are lots of benefits to a rooted phone.
