Ready boost has been around for a while now, since Windows Vista in fact and has been part of every Windows operating system since then and is even part of Windows 10, Microsoft’s latest operating system. You can use it to make Windows 10 a little bit snapper just by plugging in your USB flash drive (Amazon, #CommissionsEarned) But it doesn’t work on all systems so its important to know how it works and when and when not to use it.
So ReadyBoost could make your system run faster but it depends on your setup. If you have standard setup, then it could provide you with a nice performance improvement, but if you are running a high-end gaming machine with a top of the range i7 CPU for example, then you probably won’t benefit from this technique. Read on though to see how it works and how it could benefit your system.
See also: How To Spoof Your MAC Address In Windows 10
How it works
ReadyBoost is effectively a helper tool for SuperFetch which is a large component part of the Windows operating system.
SuperFetch is basically a caching technology that is designed to make Windows more responsive. So when you are switching between applications that you use most frequently, SuperFetch will monitor which files those applications are using and preload them into the cache so that they can be loaded into RAM quickly. SuperFetch can also prioritise applications as being either a low or a high priority I/O application. So if your application does lots of reads and writes to disk, then your application could take precedence over a lower-priority I/O application, improving its performance.
The main problem with SuperFetch is that often it has use your system’s hard disk for the cache. And if your hard disk is a spinning mechanical one (i.e. not an SSD), then this can slow down the transfer of data between the cache and your computer’s RAM. This is where ReadyBoost can speed things up.
So the idea is, you can connect a flash based memory stick to your computer and configure it to be a ReadyBoost device. Then, SuperFetch will copy cache data from the hard disk onto the flash device and enlist it to become part of the caching process. So when the data is moved into RAM, it will be much quicker since flash memory is quicker to read compared to reading memory on a mechanical hard disk. But that’s not all, because its a little smarter than that in reality because some operations are actually quicker to do on a hard disk. For example, SuperFetch will perform sequential read operations on the hard disk cache because it is much quicker than flash at this type of operation. On the other hand, ReadyBoost will redirect SuperFetch to use the cache on the flash-based drive for non sequential read operations.
Some mechanical hard disks can actually outperform some flash based drives for non sequential read operations, so in that case, ReadyBoost won’t give you the performance boost you are hoping for. Conversely, even if you have a really fast hard disk, there are some situations where you could get a performance boost, so don’t throw in the towel just yet.
To use ReadyBoost, you need either an external USB flash drive (Amazon, #CommissionsEarned), SD card or CF card. Either of these will be used as a hard disk to improve disk read performance. The device must have at least 250MB of disk space but one to three times the amount of RAM you have in your system is recommended. Your device also has to be fast enough in terms of read and write speeds but don’t worry, as Windows will automatically check the performance of any removable drive.
How to use ReadyBoost
Step 1:
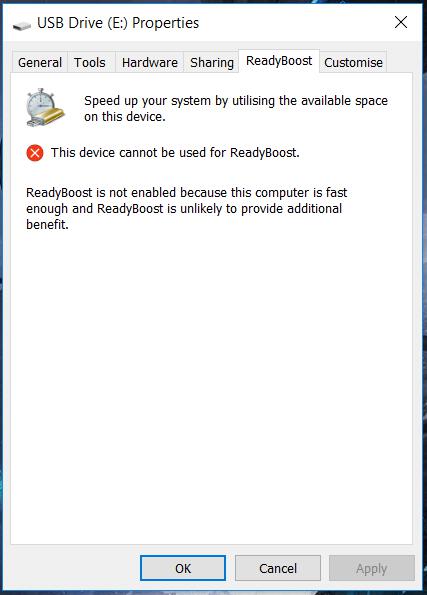
Access the Properties of the device and select the ReadyBoost tab. Windows will then begin a series of tests to determine whether or not your device is compatible with ReadyBoost. If it is not compatible, you’ll see a message saying “This device cannot be used for ReadyBoost”. You may also see this message if you computer has an SSD in it because when you couple an SSD along with SuperFetch, it will already outperform ReadyBoost.
Step 2:
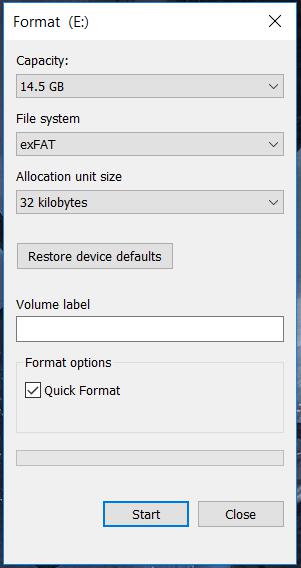
Assuming your device is compatible, you’ll see some options which will enable you to configure the device for ReadyBoost. First reformat the drive using exFat (which is designed for flash memory devices) using the default Allocation Unit size.
Step 3:
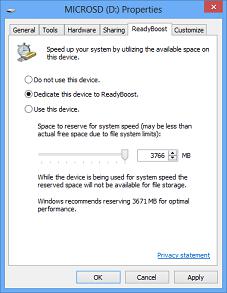
After you have formatted the drive, select the ReadyBoost tab once again, and choose the “Dedicate this device to ReadyBoost” option.
Step 4:
Click OK and ReadyBoost will configure the device and will create a disk cache file called “ReadyBoost.sfcache” in the root of the flash drive.
See also: How To Setup A Virtual Machine On Windows 10
Congratulations, you’ve configured your device for ReadyBoost! Bear in mind though that ReadyBoost won’t work on all systems and it will depend on what applications you run and the type of read/write operations those applications do as to whether you’ll get a noticeable performance boost. Let me know your experiences with this technique in the comments below!
