Microsoft Outlook is the center of the universe for many office workers and comes bundled with Office 365 (Amazon, #CommissionsEarned). So given the amount of important emails, contacts and calendars that are stored in Outlook, it’s probably a good idea to back them up from time to time.
Why? Well if you’re moving to a new PC, it’s easier just to load your data from a single file rather than having to go through the painstaking process of setting up your email accounts again.
Maybe you’re planning to leave your job, but still want to keep in touch with a few colleagues. In which case, it would be good if you had a copy of all your emails and contacts just in case you wish to refer to them in the future.
Moreover, the actual Outlook PST file (Personal Table Storage) can become corrupt, so you might want to export your stuff just in case this happens.
You may be thinking that you use web-based applications such as Outlook.com or Gmail, but it can still be good practice to have a copy of your emails locally and use a desktop client. Because even Google and Microsoft have disasters now and again.
Luckily, Outlook makes it simple to manually backup your account and settings, and to re-import them for easy setup. This guide will show you step-by-step how to import and export your Outlook emails and it applies to Office 2003, 2007, 2010, 2013 and 2016.
How to export your emails from Outlook
Instruction #1: To start exporting your files in Outlook, click the File menu and select Open & Export from the left-hand menu.

Instruction #2: Next, click on the Import/Export button which will open the Import and Export Wizard.

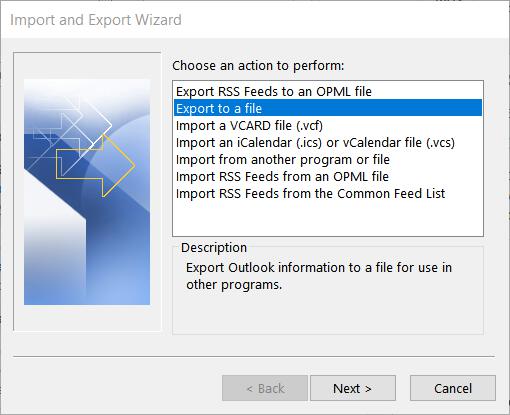
Instruction #3: In the Import and Export wizard, select Export to a file from the action list and click Next, which will result in two options.
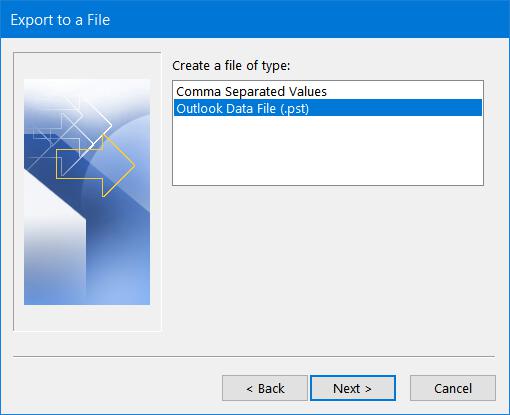
Instruction #4: On the next screen, you will get two options. The option I recommend selecting is Outlook Data File (.pst). So go ahead and choose this option and click Next again.
Instruction #5: On the next screen, you’ll see a bunch of files and folders to choose from. Now, you’ll want to create a complete backup of the files for one email account. So to do this, all you have to do is click on the email address associated with the account which is at the very top of the list and then click Next. Make sure that the Include subfolders checkbox is checked so that export all the information that you need.
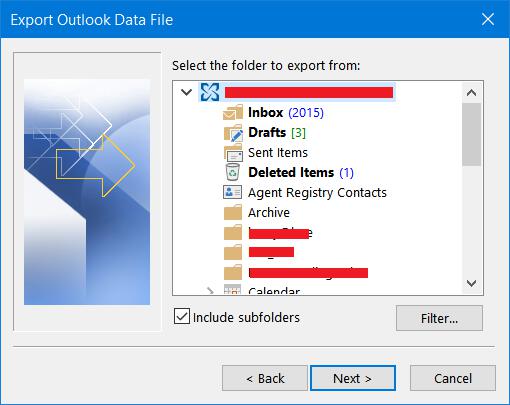
If you want more control, you can click on an individual mail folder, the Contacts or Calendars section, or any of the other options in the list. Now by default, all of the subfolders within a selected folder will be backed up as well.
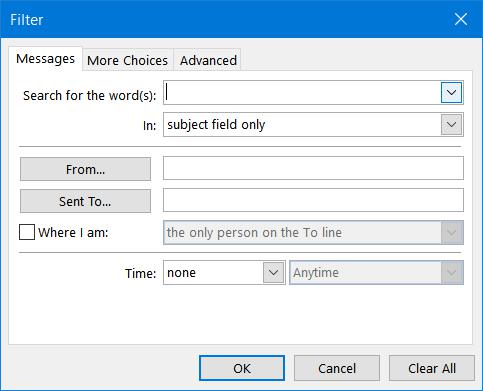
If you don’t want this option, then first of all, uncheck the box marked include subfolders. Then if you wish to remove specific emails from the backup, like emails sent to and from your own email address, click filters. Filters are quite powerful in that you can search by a particular word, subject, body field, the to or from address, or time. You can even go a step further and add a filter for things like size, flags and importance ratings. To access these additional filters, simply select the More Choices and Advanced tabs. Once you’re finished, click OK to return to the export menu.
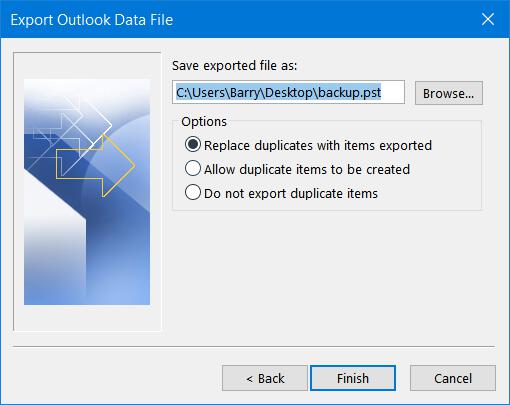
Instruction #6: The next screen allows you to select the location and name of your backup file. Click Browse, then navigate to the location where you wish to save the file, name the file, and click Finish.
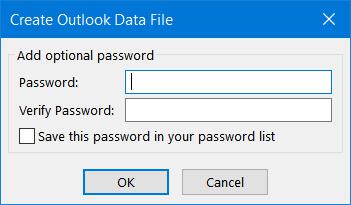
Instruction #7: Next you’ll be asked to create a password for your exported file. Make sure this password is secure, especially if you’re exporting some sensitive emails. Read how to create a secure password if you’re not sure.
Once you’ve created a password, click OK, and then you’ll be asked to retype your password on the next screen. Enter your password again and click OK.
Your emails etc will now be exported. Keep in mind though that it may take a few seconds, especially if you’ve got a lot of emails stored in Outlook.
A note on your backup file
Now your exported PST file is just like any other file in that it can be copied anywhere or moved. And if I were you, I’d keep it in a safe place either on a USB drive, an external drive or in the cloud on OneDrive or Google Drive for example. Bear in mind though, when you’re transferring or sending the PST file that it can get quite big depending on how many emails you’re exporting.
One other to remember is that your PST is not a live file, so in other words, any emails that you send or receive won’t be bundled in the file after you’ve created it.
Importing backups
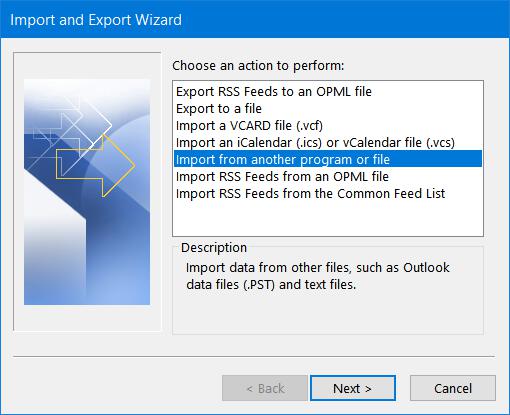
Instruction #1: Importing PST backup files is similar to creating them. Perform instruction #1 and instruction #2 above then select Import from another program or file and click Next.
Instruction #2: On the next screen select Outlook Data File (.pst) and click Next again.
Now, click on Browse, and find the file that you wish to import. It could be on your local machine (C: drive for example), on a USB drive (Amazon, #CommissionsEarned) or even on a network drive like OneDrive. Once you’ve selected your file, you can choose to replace duplicate emails and contacts with imported items, allow duplicates to be created, or simply not import duplicates at all in the Options area below the browse button

To help you choose which option to select, if the backup file is newer than the emails you currently have in Outlook, select Replace duplicates. If the file is older than the current emails in Outlook, select Do not import duplicates.
In general though you don’t need to select Allow duplicates to be created unless you know you need specific information from both the old and new files. Click Next when you’re ready to proceed.
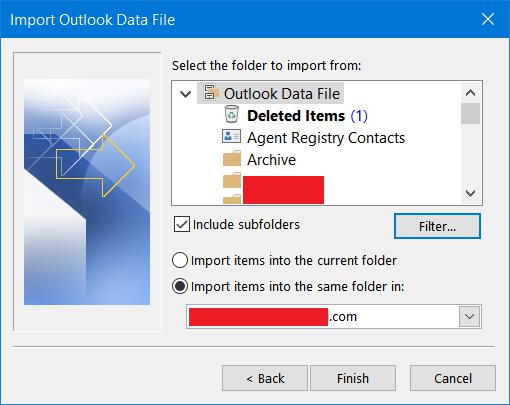
Instruction #3: On the next screen, enter your password and hit OK. Then on the next screen, you can select the folder that you want to import from. So, you can either import the whole Outlook Data File or you can choose an individual folder. There’s also a checkbox which allows you to include subfolders (similar to the export functionality above).
If you’re importing the information from a single account, just click Outlook Data File.
When you’re ready to import, click Finish and if prompted, enter the password associated with your file.
Once the import has finished, your emails and other settings will appear in Outlook.