Image credit: Alan Levine/Flickr
If you use public Wi-Fi like myself, then you’ve probably come across this problem before.
Basically what happens is, you select the Wi-Fi network that you want to connect to, and your phone says you’re connected.
So you go to your apps, or try to load your favourite website, and then nothing, no internet 🙁
This happens every time to me when I try to get on the bus’s free Wi-Fi. It’s very frustrating. Sometimes the Wi-Fi login page pops up automatically, but other times, nothing happens.
If, like me, you’ve tried a number of things previously to get the sign in page to pop up such as resetting the Wi-Fi, forgetting the network and restarting the phone then things, then you’ve probably realized that these things don’t work.
So after doing some research around this, I’ve learned that the most common problem is not with the internet connection itself but with your device’s connection to the router. It’s probably a bug in the router firmware or a bug in Android that’s causing it.
So, to help you solve this problem, I’ve compiled a couple of methods you can try to get back to high-speed connectivity in no time
Restart Your Device
Let’s start with the easiest and most obvious. Your device may just need a quick reboot to get rid of the bad juju that it got from your last session or from extended use.
Whether there were settings that accidentally changed or some glitch that occurred on your system, a good restart couldn’t possibly hurt. Although, if you’re working on something important, don’t forget to save your work to the local disk before you do this.
However, if a reboot doesn’t work, it may need a bit more elbow grease than just hitting the restart button.
Use the Router IP Address
All computers, whether it’s a PC or a Mac, can be prone to bugs. Routers are no different.
A bad firmware update can make your connection buggy or downright unusable. For public Wi-Fi, some bugs can cause your device to not show the log-in screen.
Normally, you can easily fix this problem by simply restarting the router. However, since you’re trying to connect to public Wi-Fi, it’s not always such a good idea to ask the staff the restart the router.
To do this, you just must key in the router IP address on your browser. The most common one is 192.168.1.1. This should bring you straight to the log-in screen.
However, if this doesn’t work, you may need to find the exact router IP address.
Luckily, it’s easy enough to do this especially if you’ve connected to this router before.
Step 1
On your taskbar, right-click on your wireless network. And click on “Open Network & Internet Settings”
Step 2
Click on “Change Adapter Settings”
Step 3
Click on your current connection
Step 4
In the pop-up screen, click on “Details”
Step 5
Search for “IPv4 Default Gateway.” The numbers next to it should be your router’s IP address.
If you’re on Android, please follow the steps below:
Use The Router IP Address On Android
Well, first of all, open up a browser and then try to navigate to a webpage. If that doesn’t trigger the sign in page, then follow these steps:
Step 1
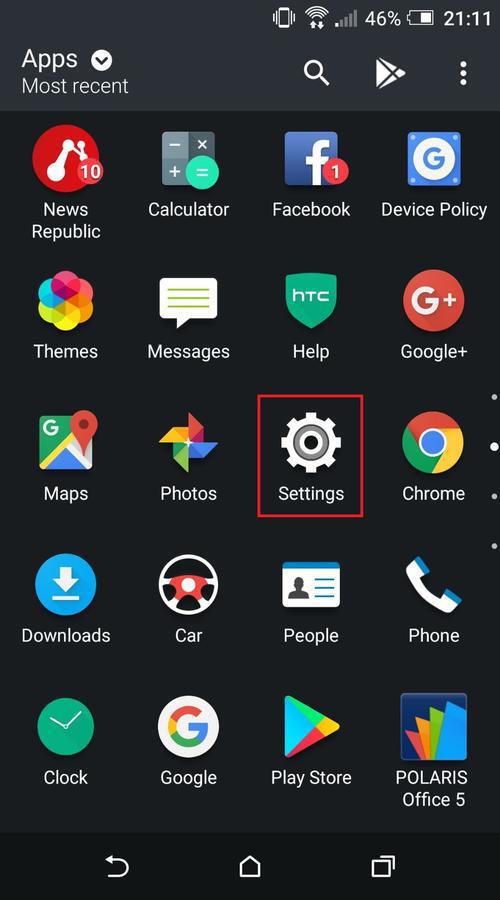
Go to Settings
Step 2
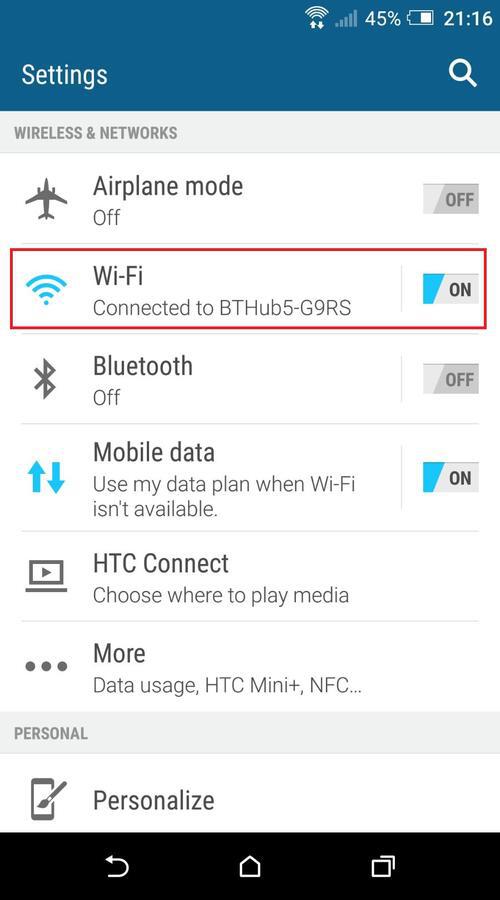
Tap “Wi-Fi”
Step 3
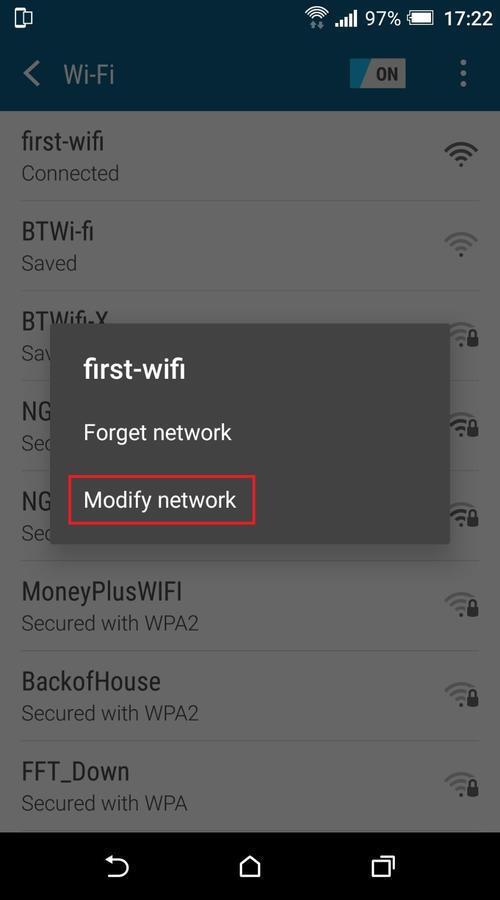
Find the Wi-Fi network that you want to connect to, then press and hold, and tap “Modify network”
Step 4
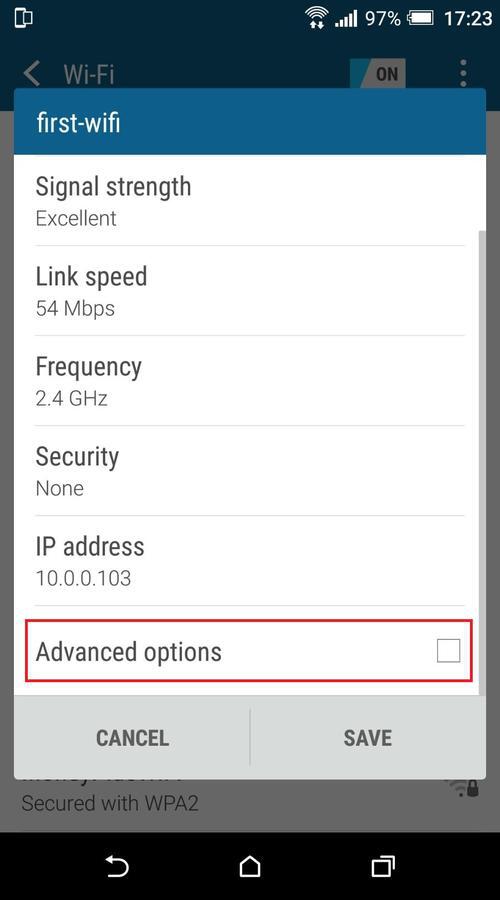
Scroll down and tick “Advanced options” or “Show advanced options”
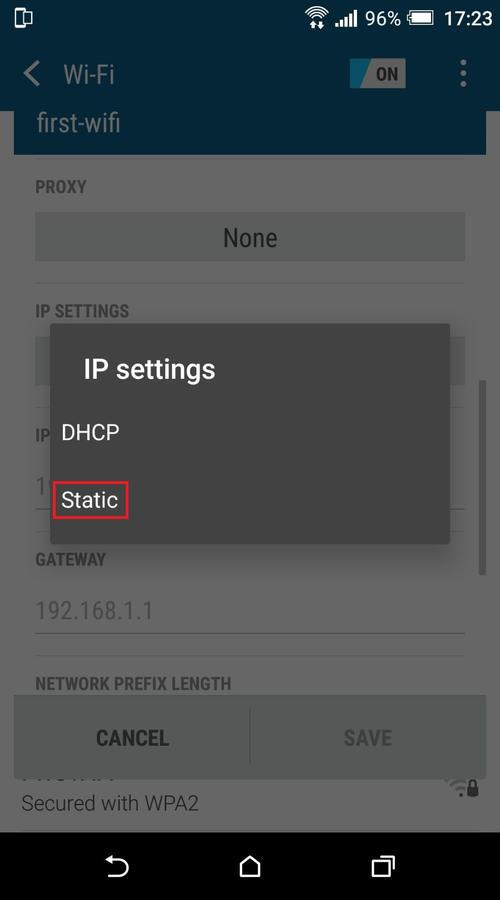
Step 5
Under “IP Settings” switch from DHCP to Static
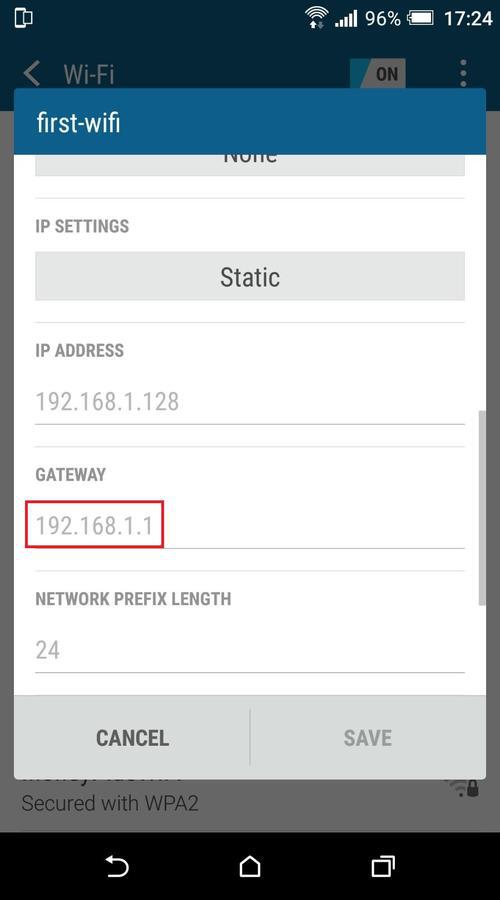
Step 6
Scroll down until you see the “Gateway” field. This is the router’s IP Address – make a note of this.
Step 7
Open your browser and type the router’s IP Address that you made a note of in step 8 into the address bar in the browser.

Most of the time, when you type this address into the browser, you will be redirected to the sign in page.
It works for me on my mobile and I see no reason why it wouldn’t work on other devices too.
Stop Using Third-Party DNS
An outdated or faulty DNS can also cause your machine to fail to show your public Wi-Fi’s log-in page. This is because the DNS interprets, translates, and relays the data from your computer to your router.
Sometimes your ISP or, if you’re using a corporate laptop, your IT department changes the DNS on your device for security reasons. This can be the source of your problems if you’re trying to connect to a public Wi-Fi.
One workaround in this case is to temporarily use a more common DNS. Luckily, Google’s own public DNS is easy to remember. It’s 8.8.8.8.
Here’s how you can change your device’s DNS:
Step 1
On your taskbar, right-click on your wireless network. And click on “Open Network & Internet Settings”
Step 2
Left-click on the “Change Connection Properties”
Step 3
Under the IP settings, click on “edit”.
Step 4
From there, toggle IPv4 on and enter the 8.8.8.8 on the preferred DNS
Step 5
Disconnect and try to reconnect your network connection.
Try a Different Browser
A buggy default browser can also affect how you log-in to public Wi-Fi connection. If you’ve tried restarting and changing the DNS, changing your default browser might be worth a look.
This is because the log-in page uses the browser interface to log in, if the browser itself is glitchy, it can impede the log in process.
If you suspect that this is the case, just do the following.
Step 1
Click on the “Start Menu”
Step 2
Type “Default Apps” and click on the first item on the search results
Step 3
Under the “Web Browser” choose and click on your secondary browser as the new default.
Disable Pop Up Blocker
Speaking of browsers, the pop-up blocker on your default blocker might be what’s hindering the login page from starting up. To work around this, try to temporarily disable your browser’s pop-up blocking function.
Here’s how to do it if you’re using Google Chrome:
Step 1
Launch your browser and click the hamburger menu or the three dots on the upper right corner of your screen.
Step 2
From the context menu, click on Settings.
Step 3
Under the “Privacy and Security” heading, find ‘Site settings’ and click on ‘Pop-ups and redirects’ at the drop-down options.
Step 4
Switch the toggle to “Allowed”
Step 5
Close the Settings tab, then close the browser.
Step 6
Disconnect and reconnect your computer’s Wi-Fi and relaunch the browser.
Launch Your Browser in Incognito Mode
Over the years, your browser history, downloads, and cache can get too cluttered to function properly.
So, clearing these can be an option. But that should be the last resort because there’s an option you can try out before doing that.
Launching incognito mode launches a fresh session on your web browser. It also forgoes loading up your browsing history, cache, and downloads so it should mimic a fresh install of your browser.
To do this, just launch your browser and click Ctrl+Shift+N.
(Temporarily) Switch Off Your Firewall
Your computer’s firewall may also prevent you from connecting to public Wi-Fi. Which, if it does this, maybe you shouldn’t even try connecting in the first place.
However, if you’re in a pinch and you need to bite the bullet, here’s what you need to do to disable your firewall to let log in page through.
Step 1
Launch your “Settings” program by clicking on the Start Menu, typing “settings” and clicking on the first app the appears in the search results
Step 2
On the search box of your “Settings” app, type in “Windows Defender Firewall” and click on the first one on the results
Step 3
On the left-hand side of the screen, click on the option that reads ‘Turn Windows Defender Firewall on or off.’
Step 4
Click on the checkbox that reads “Turn off Windows Defender Firewall (not recommended)”
Step 5
Quit the program and then restart your device. Connect to the Wi-Fi and you should see the log-in page pop-up.
Do not forget to turn your firewall on again when you’re done.
Update Network Driver
The case could also be that you just have an outdated network driver. Drivers are updated more often than you think. Most of us just don’t realize it’s already going on in the background.
While an outdated driver shouldn’t cause you much trouble, there’s a chance that it may be hindering you from connecting to a public Wi-Fi.
So, if ever this is the case, you can easily update your network driver by doing the following steps.
Step 1
Click on the “Start Menu” and type “Device Manager”. Click on the first application that pops up on the search result.
Step 2
Search for “Network Adapters”, find your Wi-Fi connection and double click on it.
Step 3
Click on the “Driver” on the pop-up menu, then click on update driver.
Step 4
Exit the “Device Manager” program and restart the computer. Your log-in page should start up on its own after you reconnect your Wi-Fi.
The case could also be that your computer just installed a bad update. You may also want to try to roll-back the driver to a previous one if this is what you suspect.
Get a New Lease on DHCP
One of your router’s security features is called the Dynamic Host Configuration Protocol. It assigns an IP address to each device that’s connected to it.
This way, it would be difficult to find out the exact IP address of a particular connected device.
This prevents hackers from getting into other people’s computers which is an important feature in a public Wi-Fi connection.
But, sometimes, this security feature can also prevent you from getting into the connection. You see, DHCP changes all the time which is why it’s called dynamic.
If the IP address that you were previously assigned already expired, you’re going to have to get a new one.
Your computer should automatically do this while you’re connected to the router. However, there are times when it doesn’t because of some glitch or error.
Luckily, you can do this yourself by following these simple steps:
Step 1
Click on the “Start Menu” and type in “CMD”. Run the first app that turns up on the search results
Step 2
On the command line in the app, type “ipconfig/release” and press enter.
Step 3
After the program finishes, type in “ipconfig/renew” in the command line and then press enter.
Step 4
Wait for the process to end and then close the “Command Prompt” application.
Step 5
Disconnect and then reconnect to the Wi-Fi you wish to connect to and then launch your browser.
What if None of This Works?
Despite having so many ways force open a public Wi-Fi’s log-in page, there’s still a huge chance that the servers are just down during that day.
If that’s the case, there’s no single thing you can do to get to that log-in page.
But fear not because there are alternatives to public Wi-Fi. You can, for example, try connecting your laptop to your smartphone’s LTE connection.