Let me fill you in on a little secret if you’re using Google Chrome or any of the other Chromium-based browsers out there. That little text box where you see this website’s address isn’t really called the address bar anymore.
It’s officially called the “Omnibox”.
You probably don’t realize it but, it’s one of the biggest reasons you and the rest of the world are using Chrome.
Before Google Chrome came to life, web browsers, like the doomed Internet Explorer, have become so cluttered with plug-ins, enterprise tools, and other knick-knacks that didn’t really enhance user experience.
Then, seemingly out of nowhere, Google came up with Chrome.
Right away, the new browser set itself apart from all existing web browsers because of its simple and straightforward design.
All it had was the “Omnibox” and the web.
There was none of the clutter that plagued every other web browser in the market.
That was back in 2008.
Since then, Google Chrome has dominated the browser market with fresh takes and better features that made surfing the web faster and simpler; one of those features being the Omnibox.
With that said, let me show you how you can make the most out of Chrome’s fabled Omnibox.
What is the Omnibox?
In essence, the Omnibox is a combined URL bar and a search box. This means that you don’t have to keep returning to the Google web page to make new searches meaning that Google is present in every query you make on your browser.
Autocomplete
One important feature of the Omnibox is that as you type into it, it contextualizes all of your previous searches that are relevant to what you’re typing into the Omnibox.
With just the first few letters, Google can make an inference, based on the wealth of data it has on you, about what you intend to search for.
Google would then give you a couple of suggestions and proceed to auto-complete your query.
If like most people, you can’t get enough social media, typing “f” into your Omnibox would probably autocomplete to Facebook.

Custom Search Engine
Another time-saving search feature is the search engine customizability. Let’s say you want to search a specific website. With a little elbow grease, you can specify where your Omnibox queries searches.
If, for example, you wanted to search Amazon for a new Bluetooth speaker, you can bypass the homepage and go straight to searching the website via the Omnibox.
You only have to set it once and after that, you can just type on your Omnibox and it’ll automatically search Amazon or any other website of your choosing.
Tedious work like researching should be made easier through this excellent feature.
Here’s how to do it:instead
- Open Google Chrome.
- Click the three vertical dots located at the top right corner of the page. It should be in line with the Omnibox and below the X button.
- Click on Settings.
- Once there, click on Search Engine.
- Next, click on Manage Search Engines.
- Once there, you will see three things: your Default search engines, Other search engines and a button that says Add.
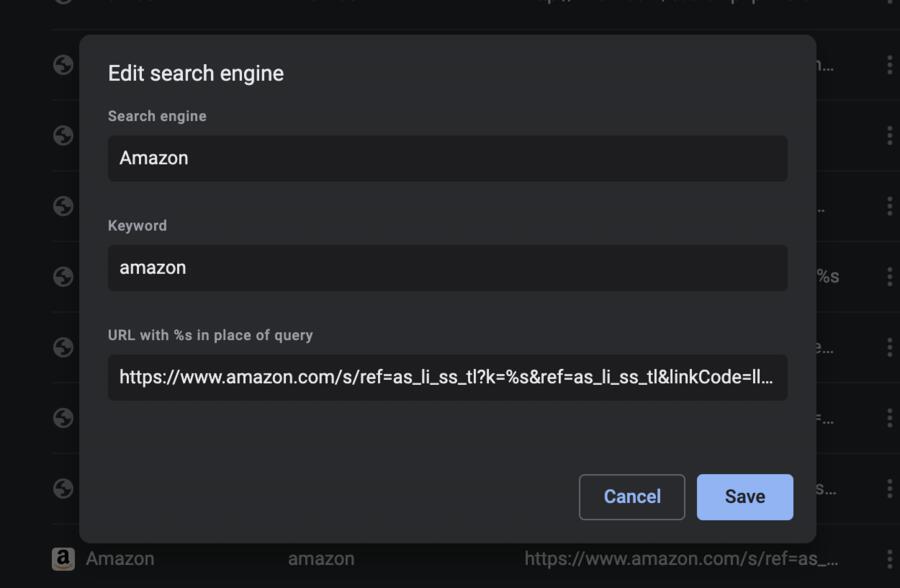
- Click on Add.
- A box will appear for you to fill up. Enter the Search engine (Amazon), your preferred Keyword (Amazon) and the URL with %s in place of the query. For example, the URL should look something like this: https://www.amazon.com/s/ref=as_li_ss_tl?k=%s&ref=as_li_ss_tl&linkCode=ll2&tag=bat-us-20&linkId=6c6a9fcde6372a5ff73619b1f7459413&language=en_US (#CommissionsEarned)
So, next time you want to search Amazon, you can just type the keywords you designated for that site (Amazon) into the Omnibox then hit enter.
You’ll be taken directly to the search screen on your designated website and you can also apply this to almost any website or search engine.
You can even apply this to Google Drive applications such as Google Docs, Google Sheets, Google Slides; or even to your Gmail, your history page and your bookmarks page.
Do so and shave off seconds you used to spend sorting through your files, e-mails, sheets and documents.
Google Docs, Sheets, and Slides Integration
Speaking of Google Drive, do you know that you can also create documents, spreadsheets, presentations, forms, etc. right from your Omnibox without having to navigate to Google Drive? All you have to do is to type in these shortcuts into the Omnibox:
- Google Docs: doc.new, docs.new, document.new
- Google Sheets: sheet.new, sheets.new, spreadsheet.new
- Google Slides: slides.new, deck.new, presentation.new
- Google Forms: form.new, forms.new
- Google Sites: site.new, sites.new, website.new
Want to add a new event into your Google Calendar? Yes, you can also go ahead and add one from your Omnibox!
Just like before, go to Edit search engines and input these after clicking on Add.
Add new search engine: Add Calendar Event
Keyword: cal
URL: https://www.google.com/calendar/event?ctext=+%s+&action=TEMPLATE&pprop=HowCreated%3AQUICKADD
With that in place, whenever you want to add an event without going to Google Calendar, just type the keyword in the Omnibox, hit the spacebar, then type in the event you want. (e.g. Lunch with Mom on Friday, 12 noon). (Disclaimer: Confirming the event is still done in Google Calendar.)
More Tips and Tricks to Optimize the Omnibox
There are plenty more things you can do with the Omnibox.
Take it from its name. “Omni”, which translates to “universal”. The Omnibox can do almost any task you give it on the web. All you have to do is explore to discover the many things it can do.
Here are just some of them:
Timer
If you practice the Pomodoro technique, you’d be glad to know that just typing “timer 30 minutes” on your Omnibox would automatically start a timer on a new tab.
Roll a Dice and Flip a Coin
Finding it hard to decide? You can toss a virtual coin if you type in “flip a coin.” Or, for more complex decisions, you can roll dice .
Define
This one is already a popular feature of the Omnibox. Just type in “meaning of”, “define” or “definition of”, then the word you want to be defined.
Or, an even cooler and less known way to do it is this: on any site, highlight a word, drag and drop the word into the Omnibox, then hit enter.
Math
When a calculator isn’t readily available, you can use the Omnibox instead. You can perform basic mathematical computations directly on your browser.
Graphs
Google goes on geek mode even further by giving you the ability to graph functions you key into your Omnibox.
Measurement and Currency Conversions
You can also perform quick conversions on the Omnibox too.
For weight, length, and even up-to-date foreign currency conversions, you can just type in your parameters on your Omnibox and get an answer right away
Map
Type in map then location a to location b, then hit enter. Watch as a map pops out. (e.g. map Lower Hutt to Wellington)
Weather
Type in weather then the name of a city or a zipcode to get the weather of that specific location (e.g. weather New York).
Translate
Type in translation of or translate, the word you want to be translated, and the language you want it translated to (e.g. translate money to French).
How to Turn Off the Omnibox
Now, the Omnibox feature is automatically enabled when you install Google Chrome in order to provide you with a fast, convenient and customized browsing experience.
However, you may want to disable Google Chrome’s Omnibox for privacy reasons.
You might prefer not having information such as your browsing history, bookmarks, and other information stored by Google.
Well, don’t worry! Google Chrome allows you to turn off the Omnibox feature.
Although, I have to warn you that it’s a pretty tedious process.
To do this, you must turn off the following: the Omnibox history sync, the delete search suggestion and URL prediction, and the history and autofill form data.
Here’s how to do it:
- Turn off Omnibox history sync
- First, open Google Chrome. You should be logged in to your Google Account.
- Click on the three vertical dots at the top right corner of the page.
- Click on Settings.
- Click on Sync.
- Click on Advanced Sync Settings.
- Lastly, turn off the History option.
- Delete History, Cookie and Autofill data
- First, open Google Chrome. Again, you must be logged in to your Google Account.
- Click on the three vertical dots at the top right corner of the page.
- Click on Settings.
- Click on Advanced.
- Go to Time Range.
- Choose the All Time option.
- Tick Browsing history, Cookies and other site data, and Autofill form data.
- Lastly, click on Clear data.
- Delete search suggestions and URL predictions
- First, open Google Chrome. Again, you must be logged in to your Google Account.
- Click on the three vertical dots at the top right corner of the page.
- Click on Settings.
- Click on Advanced.
- Go to Privacy and Security.
- Under Privacy and Security, look for the option Use a prediction service to help complete searches and URLs typed in the address bar.
- Click on it to disable.
